# Overview
Source: https://docs.namespace.ninja/api-reference/introduction
API reference for the Mint Manager and Offchain Manager (Subnames) APIs with authentication and endpoints.
## Offchain Manager API
The Offchain Manager API allows you to create, update, delete, and retrieve offchain ENS subnames and their associated records by using the Namespace.
### Authentication
Some endpoints require authentication via API key using the `x-auth-token` header. You can generate API keys through the [Namespace Dev Portal](https://dev.namespace.ninja/).
```bash
x-auth-token: YOUR_API_KEY
```
Register new subnames with text records, addresses, and metadata.
Get detailed information about existing subnames by full name.
Remove subnames from the system (requires API key).
Query multiple subnames with flexible filters including parent name, label
search, ownership, and metadata.
## Mint Manager API
The Mint Manager API allows you to estimate and generate mint parameters for ENS subnames.
Get estimated price, fee, and validation status for a requested subname.
Generate signed mint parameters ready to be used on-chain.
# Estimate mint params
Source: https://docs.namespace.ninja/api-reference/mint-manager/estimate-mint-params
openapi/mint-openapi.json get /api/v1/mint/estimate
Get estimated minting parameters and validation results.
# Generate mint params
Source: https://docs.namespace.ninja/api-reference/mint-manager/generate-mint-params
openapi/mint-openapi.json post /api/v1/mint
Generate mint parameters and return a signed payload.
# Create or update a subname
Source: https://docs.namespace.ninja/api-reference/offchain-manager/create-or-update-a-subname
openapi/offchain-openapi.json post /api/v1/subnames
Creates or updates an offchain subname under a parent ENS name. Requires a valid API key.
# Delete a subname
Source: https://docs.namespace.ninja/api-reference/offchain-manager/delete-a-subname
openapi/offchain-openapi.json delete /api/v1/subnames/{fullSubname}
Deletes an existing offchain subname by its full name. Requires a valid API key.
# Get subname by full name
Source: https://docs.namespace.ninja/api-reference/offchain-manager/get-subname-by-full-name
openapi/offchain-openapi.json get /api/v1/subnames/{fullSubname}
Retrieves the details of a specific offchain subname using its full name (e.g., alice.oppunk.eth). Returns the subname details if found.
# Query subnames
Source: https://docs.namespace.ninja/api-reference/offchain-manager/query-subnames
openapi/offchain-openapi.json post /api/v1/subnames/search
Searches for subnames matching the provided criteria.
# Address SDK
Source: https://docs.namespace.ninja/changelog/address-sdk
Changelog for the Address SDK with version updates and changes.
* Changed:
* SDK renamed to `@thenamespace/addresses`.
# Indexer SDK
Source: https://docs.namespace.ninja/changelog/indexer-sdk
Changelog for the Indexer SDK with version updates and changes.
* Changed:
* **BREAKING**: SDK renamed to `@thenamespace/indexer` from `@namespacesdk/indexer`.
* Enhanced error handling with detailed error context and logging.
* Improved TypeScript types with comprehensive JSDoc documentation.
* Added response interceptors for better error reporting.
* Updated default timeout to 30 seconds.
* Enhanced HTTP client configuration with better defaults.
* Added:
* Comprehensive JSDoc documentation for all interfaces and methods.
* Better error handling with enhanced error messages.
* Support for custom HTTP client configuration.
* Improved type safety with detailed interface documentation.
* Enhanced developer experience with better examples and documentation.
* Repository metadata and support links.
# Offchain SDK
Source: https://docs.namespace.ninja/changelog/offchain-sdk
Changelog for the Offchain SDK with version updates and changes.
* Added:
* **Optional API Key Configuration**: Added support for `defaultApiKey` and `domainApiKeys` during client initialization
* **No-Parameter Client Creation**: Support for creating clients without parameters (defaults to mainnet)
* Enhanced:
* **Improved Developer Experience**: Better inline API key setup workflow
* **Documentation Updates**: Updated documentation and examples to reflect new features
* Fixed:
* **Coin Type Corrections**:
* Fixed Sui coin type from `101` to `784` (correct SLIP-44 identifier)
* Fixed Starknet coin type from `234567891` to `9004` (correct SLIP-44 identifier)
* Updated test script to include Sui address validation testing
* Testing:
* **Enhanced Test Coverage**:
* Added Sui address record testing in manual test suite
* Improved validation for blockchain-specific coin types
* Added:
* **New Blockchain Support**: Added support for 7 new blockchain networks:
* Unichain
* Berachain
* WorldChain
* Zora
* Celo
* Aptos
* Algorand
* Enhanced:
* **Improved Address Validation**:
* Enhanced Starknet address validation to support variable-length hex addresses (1-64 characters)
* Improved Bitcoin address validation to support Legacy (P2PKH), Script (P2SH), Bech32 (P2WPKH/P2WSH), and Taproot (P2TR) formats
* Updated Cosmos address validation to use proper bech32 format with 'cosmos1' prefix
* Enhanced NEAR address validation to support both implicit accounts (64 hex chars) and named accounts (.near)
* Improved Sui address validation to support variable-length hex addresses (1-64 characters)
* Added Aptos address validation with variable-length hex support
* Added Algorand address validation using Base32 format (58 characters)
* Testing:
* **Comprehensive Test Coverage**:
* Added validation tests for all new blockchain chains
* Enhanced Bitcoin address validation tests with multiple format support
* Added Starknet address validation tests for both full and shortened addresses
* Added Cosmos, NEAR, Sui, Aptos, and Algorand address validation tests
* Added EVM-compatible chain address validation tests
* Enhanced `README.md`:
* Added Supported Chains section with a quick reference of available blockchain networks.
* Added Error Handling section with try/catch examples and specific error classes.
* Adopted Keep a Changelog format and Semantic Versioning.
* Initialized `CHANGELOG` documentation for the `@thenamespace/offchain-manager` package.
* Changed:
* **BREAKING**: Package renamed from `@namespacesdk/offchain-manager` to `@thenamespace/offchain-manager`. This is the canonical package going forward.
* Enhanced package description for better discoverability.
* Updated repository information and added homepage.
* Added comprehensive keywords (ens, ethereum, subnames, domains, web3, sdk, etc.).
* Added engines specification requiring Node.js >=16.0.0.
* Added publishConfig for public access.
* Documentation:
* Enhanced `README.md`:
* Added comprehensive API key types documentation (Address-based vs Domain-based).
* Updated all code examples with the new package name.
* Improved environment setup instructions.
* Added mixed usage examples for API keys.
* Updated Namespace Dev Portal section with API key type explanations.
* Improved `TESTING.md`:
* Updated title and package references.
* Fixed environment configuration examples.
* Updated CI/CD workflow examples.
* Improved code formatting and consistency.
* Package improvements:
* Repository field with proper GitHub organization link.
* Homepage field pointing to `https://namespace.ninja`.
* Bugs field for issue tracking.
* PublishConfig for NPM organization publishing.
* Enhanced metadata for better package discovery.
* Fixed:
* All import statements updated to use the new package name.
* Documentation consistency across all files.
* `package.json` validation and best practices compliance.
# Building with AI
Source: https://docs.namespace.ninja/developer-guide/ai-development
AI DevX at your service.
Use the Copy and Ask in ChatGPT/Claude buttons on each page to quickly work with the docs.
export const PreviewButton = ({children, href}) => {
return {children};
};
## LLM-friendly documentation
Get AI-optimized plain text for any page or the entire corpus.
Open llms.txt
Open llms-full.txt
### Markdown export
* Press Command + C (Ctrl + C on Windows) to copy a page as Markdown to your clipboard.
* Append `.md` to any docs page URL for a markdown version of the page.
### llms.txt
* Access a concise overview of the docs and list of pages at `/llms.txt`.
* Download the complete documentation at `/llms-full.txt`.
`llms.txt` and `llms-full.txt` return markdown text, condensed for AI consumption.
***
## MCP Server
Browse our documentation from your AI IDE via our hosted MCP server.
### Connection details
* **MCP Server URL**: `https://docs.namespace.ninja/mcp`
### Available tools
* **Search**: Query docs to find examples, API references, and guides. Returns titles, context, and deep links.
### Use with AI applications
Steps
1. In your MCP client (e.g., Cursor, Claude Desktop), add a new MCP server.
2. Use the URL `https://docs.namespace.ninja/mcp`.
3. Test and run `Search` (e.g., "Offchain SDK create subname").
### Example: Connecting to the Namespace MCP server
Connect to the Namespace MCP server to interact with the Namespace API and search our documentation. This will give you more accurate answers about how to use Namespace in your local environment and demonstrates how you can help your users connect to your MCP server.
At the top of this page, select the contextual menu and choose **Connect to Cursor** or **Connect to VS Code** to connect the Mintlify MCP server to the IDE of your choice.
To use the Namespace MCP server with Claude:
1. Navigate to the [Connectors](https://claude.ai/settings/connectors) page in the Claude settings.
2. Select **Add custom connector**.
3. Add the Namespace MCP server:
* Name: `Namespace`
* URL: `https://docs.namespace.ninja/mcp`
4. Select **Add**.
1. When using Claude, select the attachments button (the plus icon).
2. Select the Namespace MCP server.
3. Ask Claude a question about Namespace.
See the [Model Context Protocol documentation](https://modelcontextprotocol.io/docs/tutorials/use-remote-mcp-server#connecting-to-a-remote-mcp-server) for more details.
To use the Namespace MCP server with Claude Code, run the following command:
```bash
claude mcp add --transport http Namespace https://docs.namespace.ninja/mcp
```
Test the connection by running:
```bash
claude mcp list
```
See the [Claude Code documentation](https://docs.anthropic.com/en/docs/claude-code/mcp#installing-mcp-servers) for more details.
{/* Install in Cursor */}
To connect the Namespace MCP server to Cursor, click the **Install in Cursor** button. Or to manually connect the MCP server, follow these steps:
1. Use Command + Shift + P (Ctrl + Shift + P on Windows) to open the command palette.
2. Search for "Open MCP settings".
3. Select **Add custom MCP**. This will open the `mcp.json` file.
In `mcp.json`, add:
```json
{
"mcpServers": {
"Namespace": {
"url": "https://docs.namespace.ninja/mcp"
}
}
}
```
In Cursor's chat, ask "What tools do you have available?" Cursor should show the Namespace MCP server as an available tool.
See [Installing MCP servers](https://docs.cursor.com/en/context/mcp#installing-mcp-servers) in the Cursor documentation for more details.
{/* Install in VS Code */}
To connect the Namespace MCP server to VS Code, click the **Install in VS Code** button. Or to manually connect the MCP server, create a `.vscode/mcp.json` file and add:
```json
{
"servers": {
"Namespace": {
"type": "http",
"url": "https://docs.namespace.ninja/mcp"
}
}
}
```
See the [VS Code documentation](https://code.visualstudio.com/docs/copilot/chat/mcp-servers) for more details.
# Onchain Subnames
Source: https://docs.namespace.ninja/developer-guide/architecture/onchain-subnames
Learn about Namespace onchain subname activation, minting, and resolution processes.
The **Namespace platform** enables ENS name owners to **activate** their names, allowing others to mint subnames under the activated parent name. Owners have full flexibility to define custom activation parameters, including:
* Base and custom pricing
* Reserved subnames
* Whitelists
* Token-gated access
* Deadline
Namespace supports issuing subnames on both **L1 (Ethereum mainnet)** and **L2 networks (currently Base and Optimism)**.
## **ENS Name Activation**
The activation process differs depending on whether the ENS name owner chooses to issue subnames on L1 or L2.
### L1 Activation Process
Activating subnames on L1 involves **four main steps**:
1. **Create Activation Configuration** – The List Manager backend generates the activation configuration for the subname.
2. **Approve Mint Controller** – The owner grants approval to the Mint Controller smart contract. This is a **one-time approval** and does not need to be repeated for future names.
3. **Wrap the Name** – If the parent name is not yet wrapped, it must be wrapped before activation can proceed.
4. **Verify Activation** – The backend validates that all on-chain steps (approval and wrapping) have been executed correctly.
### L2 Activation Process
Activating subnames on an L2 network follows **four key steps**:
1. **Create Activation Configuration** – The List Manager backend generates the activation configuration that defines how subnames minting process functions.
2. **Deploy ERC-721 Registry** – An ERC-721 registry contract is deployed on the chosen L2 chain to manage ownership of subnames.
3. **Configure Resolver** – A resolver supporting **ENSIP-10 wildcard resolution** is set and configured to enable flexible, scalable name resolution.
4. **Verify Activation** – The backend performs validation to ensure all on-chain steps (registry deployment and resolver setup) have been completed correctly.
## Minting Process
When a name is activated, the minting process runs **off-chain**. To mint an ENS subname, the minter requests parameters and a signature from the Mint Manager server, then uses those to call the smart contract.\
This off-chain design unlocks key advantages:
* **Richer Activation Features** – Complex logic that would be impractical or impossible to run entirely on-chain can be handled seamlessly off-chain.
* **Dynamic Updates Without Transactions** – Activated name configurations can be changed instantly without requiring new blockchain transactions.
* **Lower Costs** – Both activation and minting fees are significantly reduced, making the entire flow cheaper for users.
## Resolution process
#### L1 Subnames resolution
Since L1 subnames are part of the existing ENS contracts on Ethereum mainnet, they resolve just like any other ENS name:
1. **Fetch Resolver** – Call `getResolver` on the ENS Registry to retrieve the resolver contract for `namehash(name.eth)`.
2. **Resolve Records** – Call the required resolver function (`addr`, `text`, `contenthash`, etc.) on the resolver contract.
#### L2 Subnames resolution
Resolution on L2 relies on **CCIP-Read** in combination with **ENSIP-10 wildcard resolution**.\
ENSIP-10 defines a workflow that allows resolving subnames of a parent name, even if those subnames don’t technically exist on L1.
The process works as follows:
1. **Query ENS Registry** – The client queries the ENS Registry contract for the resolver address of the subname.
2. **Fallback to Parent** – If the resolver address is the zero address, the client strips the leftmost label and queries the Registry again for the parent name’s resolver.
3. **Call Resolve** – Once a resolver is found, the client calls `resolve(name, data)`, where:
* `name` is the DNS-encoded subname.
* `data` is the encoded resolver function call.
4. **Offchain Lookup Trigger** – The resolver reverts with an `OffchainLookup` error (per \[EIP-3668, CCIP-Read]), providing:
* One or more URLs to query off-chain.
* The call data required for resolution.
* The address of the resolver contract to callback.
5. **Offchain Data Fetch** – The client performs an HTTP(s) request to the specified resolution gateway server.
6. **Response Returned** – The server processes the request off-chain and returns signed resolution data with a callback function.
7. **Callback On-Chain** – The client submits the signed response back to the resolver contract via the designated callback function.
8. **Final Resolution** – The resolver verifies the signature and returns the final resolved record (e.g., `addr`, `text`, or `contenthash`).
# How-to Guides and Demos
Source: https://docs.namespace.ninja/developer-guide/guide
Step-by-step guides and video demos for using Namespace products and services.
## Dev Guides
Learn how to mint subnames on both Layer 1 and Layer 2 using our official Mint Manager with step-by-step instructions.
Set up API keys for Offchain Subnames through the Dev Portal to start building with our APIs.
Build offchain subnames using the @thenamespace/offchain-manager SDK with comprehensive examples.
Launch your own subname minting website in minutes using our ready-made template.
## Video Demos
Learn how to tokenize your existing Web2 domains (.com, .xyz, .io, .org, .id, etc.) with step-by-step video guidance.
More demos coming soon...
# How To Create Offchain Subnames
Source: https://docs.namespace.ninja/developer-guide/guide/create-offchain-subnames
Complete guide to creating and using gasless offchain ENS subnames with the Namespace Offchain Manager SDK.
## Overview
This guide walks you through creating and using offchain ENS subnames with the `@thenamespace/offchain-manager` SDK. You'll be able to create a subname, and then read records.
## Prerequisites
* Node.js 18+ and a package manager (npm or yarn)
* An ENS name you manage (e.g., `myensname.eth`)
* A Namespace API key (from the Dev Portal)
Follow this guide to create and copy your API key from the Namespace Dev Portal.
Install the Offchain SDK and dotenv to load your API key from an environment variable:
```bash
npm install @thenamespace/offchain-manager dotenv
```
```bash
yarn add @thenamespace/offchain-manager dotenv
```
Initialise the client with the network you want to use and your API key. We recommend setting your API key via an environment variable and keeping it secret by using server-side code.
```ts index.ts
import 'dotenv/config';
import { createOffchainClient } from '@thenamespace/offchain-manager';
// Required: set NAMESPACE_API_KEY in your environment
const API_KEY = process.env.NAMESPACE_API_KEY as string;
if (!API_KEY) throw new Error('Missing NAMESPACE_API_KEY');
// Use 'sepolia' for testing, 'mainnet' for production
export const client = createOffchainClient({
mode: 'mainnet',
timeout: 5000,
defaultApiKey: API_KEY,
});
console.log('Offchain client initialized');
```
Use `isSubnameAvailable` before creating a subname to avoid overwriting an existing one.
```ts check-availability.ts
import { client } from './index';
async function main() {
const subname = 'alice.myensname.eth';
const { isAvailable } = await client.isSubnameAvailable(subname);
console.log('isAvailable:', isAvailable);
}
main().catch((err) => {
console.error('Availability check failed:', err);
process.exit(1);
});
```
Expected output (if available):
```bash
isAvailable: true
```
You can use the `owner` field to filter subnames by their associated address, enabling efficient reverse lookups (from address to name).
Create a subname under your parent name. You can include text records, address records, owner, and metadata.
```ts create-subname.ts
import { client } from './index';
import { ChainName } from '@thenamespace/offchain-manager';
async function main() {
const PARENT_NAME = 'myensname.eth';
const SUB_LABEL = 'alice'; // results in alice.myensname.eth
const OWNER_ADDRESS = '0x1234567890abcdef1234567890abcdef12345678';
// After checking the subname is available, create it with the following parameters:
await client.createSubname({
label: SUB_LABEL,
parentName: PARENT_NAME,
texts: [
{ key: 'name', value: 'Alice' },
{ key: 'url', value: 'https://example.com' },
],
addresses: [
{ chain: ChainName.Ethereum, value: OWNER_ADDRESS },
],
owner: OWNER_ADDRESS,
metadata: [{ key: 'sender', value: OWNER_ADDRESS }],
});
console.log(`Created ${SUB_LABEL}.${PARENT_NAME}`);
}
main().catch((err) => {
console.error('Create subname failed:', err);
process.exit(1);
});
```
```ts index.ts
import 'dotenv/config';
import { createOffchainClient } from '@thenamespace/offchain-manager';
// Required: set NAMESPACE_API_KEY in your environment
const API_KEY = process.env.NAMESPACE_API_KEY as string;
if (!API_KEY) throw new Error('Missing NAMESPACE_API_KEY');
// Use 'sepolia' for testing, 'mainnet' for production
export const client = createOffchainClient({
mode: 'mainnet',
timeout: 5000,
defaultApiKey: API_KEY,
});
console.log('Offchain client initialized');
```
Expected output:
```bash
Created alice.myensname.eth
```
We recommend associating a single address with a single subname to do reverse lookup.
Fetch all subnames you own or created by filtering on `owner` (or by `metadata`).
```ts
import { client } from './index';
async function main() {
const PARENT_NAME = 'myensname.eth';
const OWNER_ADDRESS = '0x1234567890abcdef1234567890abcdef12345678';
// Get all subnames owned by the address
const page = await client.getFilteredSubnames({
parentName: PARENT_NAME,
owner: OWNER_ADDRESS,
page: 1,
size: 5,
});
console.log(JSON.stringify(page.items, null, 2));
}
main();
```
Example output:
```json
[
{
"fullName": "alice.myensname.eth",
"parentName": "myensname.eth",
"label": "alice",
"texts": { "name": "Alice", "url": "https://example.com" },
"addresses": { "60": "0x1234567890abcdef1234567890abcdef12345678" },
"metadata": { "sender": "0x1234567890abcdef1234567890abcdef12345678" },
"owner": "0x1234567890abcdef1234567890abcdef12345678"
}
]
```
Retrieve a single text record or all text records on a subname.
```ts get-text-records.ts
import { client } from './index';
async function main() {
const subname = 'alice.myensname.eth';
// You can retrieve all text records on a subname
const all = await client.getTextRecords(subname);
// You can also retrieve a single text record based on a key on a subname
const { record: name } = await client.getTextRecord(subname, 'name');
console.log('all text records:', all);
console.log('name:', name);
}
main();
```
Example output:
```bash
all text records: { name: 'Alice', url: 'https://example.com' }
name: Alice
```
Address records are included in the subname response. A simple way to read them is via `getFilteredSubnames` and then inspecting `addresses`.
```ts
import { client } from './index';
async function main() {
const subnamesPage = await client.getFilteredSubnames({ parentName: 'myensname.eth', labelSearch: 'alice' });
const item = subnamesPage.items.find((i) => i.fullName === 'alice.myensname.eth');
console.log('addresses:', item?.addresses);
}
main();
```
Example output:
```bash
addresses: { "60": "0x1234567890abcdef1234567890abcdef12345678" }
```
### Next steps
* Update records on an existing subname using [`updateSubname`](/developer-guide/sdks/offchain-manager/create-update-subname)
* Explore more filters with [`getFilteredSubnames`](/developer-guide/sdks/offchain-manager/get-filtered-subnames)
* See supported chains in [`ChainName`](/developer-guide/sdks/offchain-manager/chainname)
## ENS Client Compatibility
Subnames created with the Offchain SDK can be accessed and resolved using any of the eligible ENS client libraries like [wagmi](https://wagmi.sh/), [viem](https://viem.sh//), [ethers](https://docs.ethers.org/v6/), and others listed in the [ENS Tools & Libraries documentation](https://docs.ens.domains/web/libraries/#libraries/).
Reverse Resolution Limitation: Offchain subnames do not support reverse resolution, so you cannot fetch a profile from an address. However, you can still set address records on offchain subnames for forward resolution.
# How To Mint L1 & L2 Subnames
Source: https://docs.namespace.ninja/developer-guide/guide/mint-l1-l2-subnames
Complete guide to minting ENS subnames on L1 and L2 networks using the Namespace Mint Manager SDK.
The Namespace SDK is a TypeScript library that allows developers to interact with the Namespace API and smart contracts. It abstracts the complexity of different blockchain networks and enables you to mint subnames under activated ENS names.
## Prerequisites
* **ENS Name Activation**: Your ENS name must be activated on the Namespace platform
* **Node.js**: Version 16 or higher
* **TypeScript**: Basic understanding of TypeScript
* **Web3 Knowledge**: Familiarity with Ethereum and blockchain concepts
## Getting Started
Before you can mint subnames, your parent ENS name must be activated on the Namespace platform. This is a prerequisite for all subname minting operations.
See the step-by-step guide on how to activate an ENS Name.
Install the required packages in your TypeScript project. The SDK uses Viem under the hood for blockchain interactions.
```bash npm
npm install @namespacesdk/mint-manager@latest viem
```
```bash yarn
yarn add @namespacesdk/mint-manager viem
```
Create and configure an instance of the MintClient with your custom RPC URLs and mint source.
```typescript title="mint-client.ts"
import {
MintClientConfig,
createMintClient,
MintClient,
} from "@namespacesdk/mint-manager";
export const MY_ENS_NAME = "namespace.eth";
const TOKEN = process.env.ALCHEMY_TOKEN;
const clientConfig: MintClientConfig = {
customRpcUrls: {
[base.id]: `https://base-mainnet.g.alchemy.com/v2/${TOKEN}`,
},
mintSource: "my-ens-dapp",
};
export const mintClient: MintClient = createMintClient(clientConfig);
```
**Configuration Options:**
* `customRpcUrls`: Custom RPC endpoints for different networks
* `mintSource`: Identifier for your application (used for analytics)
Create Viem public and wallet clients for blockchain interactions. These will handle reading blockchain state and sending transactions.
```typescript title="web3-client.ts"
import { createPublicClient, createWalletClient, http } from "viem";
import { base } from "viem/chains";
import { privateKeyToAccount } from "viem/account";
const TOKEN = process.env.ALCHEMY_TOKEN;
const WALLET_KEY = process.env.WALLET_PRIVATE_KEY;
const ALCHEMY_RPC = `https://base-mainnet.g.alchemy.com/v2/${TOKEN}`;
const wallet = privateKeyToAccount(WALLET_KEY);
export const BASE_ID = base.id;
export const WALLET_ADDRESS = wallet.address;
export const publicClient = createPublicClient({
transport: http(ALCHEMY_RPC),
chain: base,
});
export const walletClient = createWalletClient({
transport: http(ALCHEMY_RPC),
chain: base,
});
```
**Key Components:**
* `publicClient`: For reading blockchain state and simulating transactions
* `walletClient`: For signing and sending transactions
* `wallet`: Your account instance for transaction signing
Before minting, verify that your desired subname is available on the target network.
```typescript title="check-availability.ts"
import { mintClient, BASE_ID } from "./mint-client";
const checkAvailability = async (subnameLabel: string, parentName: string) => {
const fullName = `${subnameLabel}.${parentName}`;
const isAvailable = await mintClient.isL2SubnameAvailable(fullName, BASE_ID);
if (!isAvailable) {
throw new Error(`${fullName} is already taken!`);
}
console.log(`${fullName} is available for minting`);
return true;
};
```
Retrieve detailed information about the minting process, including costs and validation checks.
```typescript title="get-mint-details.ts"
import { mintClient, WALLET_ADDRESS, MY_ENS_NAME } from "./mint-client";
const getMintDetails = async (subnameLabel: string) => {
const mintDetails = await mintClient.getMintDetails({
minterAddress: WALLET_ADDRESS,
parentName: MY_ENS_NAME,
label: subnameLabel,
});
if (!mintDetails.canMint) {
const errorMessage = mintDetails.validationErrors[0] || "Unknown reason";
throw new Error(`Subname cannot be minted: ${errorMessage}`);
}
const totalPrice = mintDetails.estimatedPriceEth + mintDetails.estimatedFeeEth;
console.log(`Total minting cost: ${totalPrice} ETH`);
console.log(`Base price: ${mintDetails.estimatedPriceEth} ETH`);
console.log(`Network fee: ${mintDetails.estimatedFeeEth} ETH`);
return mintDetails;
};
```
**What This Provides:**
* Validation that the subname can be minted
* Estimated costs (base price + network fees)
* Any validation errors or restrictions
Create the transaction parameters needed to mint the subname, including any custom records you want to set.
```typescript title="generate-transaction.ts"
import { mintClient, WALLET_ADDRESS, MY_ENS_NAME } from "./mint-client";
const ETH_COIN = 60; // Ethereum mainnet coin type
const generateTransaction = async (subnameLabel: string) => {
const txParameters = await mintClient.getMintTransactionParameters({
parentName: MY_ENS_NAME,
label: subnameLabel,
minterAddress: WALLET_ADDRESS,
records: {
addresses: {
[ETH_COIN]: WALLET_ADDRESS, // Set ETH address record
},
texts: {
description: "My awesome subname", // Custom text record
website: "https://example.com", // Website record
},
},
});
return txParameters;
};
```
**Available Record Types:**
* **Address Records**: Set wallet addresses for different chains
* **Text Records**: Add custom metadata like descriptions, websites, social links
Simulate the transaction first to ensure it will succeed, then execute it on the blockchain.
```typescript title="execute-mint.ts"
import { publicClient, walletClient, WALLET_ADDRESS } from "./web3-client";
import { generateTransaction } from "./generate-transaction";
const executeMint = async (subnameLabel: string) => {
try {
// Generate transaction parameters
const txParameters = await generateTransaction(subnameLabel);
// Simulate the transaction
const { request } = await publicClient.simulateContract({
address: txParameters.contractAddress,
args: txParameters.args,
value: txParameters.value,
account: WALLET_ADDRESS,
functionName: txParameters.functionName,
abi: txParameters.abi,
});
// Execute the transaction
const transactionHash = await walletClient.writeContract(request);
console.log(`Subname ${subnameLabel}.${MY_ENS_NAME} minted successfully!`);
console.log(`Transaction hash: ${transactionHash}`);
return transactionHash;
} catch (error) {
console.error("Minting failed:", error);
throw error;
}
};
```
**Transaction Flow:**
1. **Simulation**: Ensures the transaction will succeed before execution
2. **Execution**: Sends the transaction to the blockchain
3. **Confirmation**: Returns the transaction hash for tracking
## Complete Example
Here's a complete implementation that combines all the steps:
```typescript title="complete-mint-example.ts"
import { mintClient, MY_ENS_NAME } from "./mint-client";
import { publicClient, walletClient, BASE_ID, WALLET_ADDRESS } from "./web3-client";
const ETH_COIN = 60;
const mintSubname = async (subnameLabel: string) => {
try {
const fullName = `${subnameLabel}.${MY_ENS_NAME}`;
// Step 1: Check availability
const isAvailable = await mintClient.isL2SubnameAvailable(fullName, BASE_ID);
if (!isAvailable) {
throw new Error(`${fullName} is already taken!`);
}
// Step 2: Get mint details and pricing
const mintDetails = await mintClient.getMintDetails({
minterAddress: WALLET_ADDRESS,
parentName: MY_ENS_NAME,
label: subnameLabel,
});
if (!mintDetails.canMint) {
const errorMessage = mintDetails.validationErrors[0] || "Unknown reason";
throw new Error(`Subname cannot be minted: ${errorMessage}`);
}
const totalPrice = mintDetails.estimatedPriceEth + mintDetails.estimatedFeeEth;
console.log(`Total minting cost: ${totalPrice} ETH`);
// Step 3: Generate transaction parameters
const txParameters = await mintClient.getMintTransactionParameters({
parentName: MY_ENS_NAME,
label: subnameLabel,
minterAddress: WALLET_ADDRESS,
records: {
addresses: {
[ETH_COIN]: WALLET_ADDRESS,
},
texts: {
description: "Minted with Namespace SDK",
mintedAt: new Date().toISOString(),
},
},
});
// Step 4: Simulate transaction
const { request } = await publicClient.simulateContract({
address: txParameters.contractAddress,
args: txParameters.args,
value: txParameters.value,
account: WALLET_ADDRESS,
functionName: txParameters.functionName,
abi: txParameters.abi,
});
// Step 5: Execute transaction
const transactionHash = await walletClient.writeContract(request);
console.log(`✅ Subname ${fullName} minted successfully!`);
console.log(`🔗 Transaction hash: ${transactionHash}`);
return { fullName, transactionHash };
} catch (error) {
console.error("❌ Minting failed:", error);
throw error;
}
};
// Usage
mintSubname("superman")
.then(({ fullName, transactionHash }) => {
console.log(`Minted: ${fullName}`);
})
.catch(console.error);
```
## Environment Variables
Create a `.env` file with your configuration:
```bash
ALCHEMY_TOKEN=your_alchemy_api_token_here
WALLET_PRIVATE_KEY=your_wallet_private_key_here
```
## Error Handling
The SDK provides comprehensive error handling for common scenarios:
* **Subname already taken**: Check availability before minting
* **Insufficient funds**: Ensure wallet has enough ETH for minting costs
* **Invalid parameters**: Validate input parameters before calling SDK methods
* **Network issues**: Handle RPC connection failures gracefully
## Next Steps
Learn about advanced minting features and customization options
Complete API documentation for the Mint Manager SDK
# Subname Developer Guide
Source: https://docs.namespace.ninja/developer-guide/guide/subpages
Build and customize your own ENS subname minting website using the white label starter kit.
The Subname Developer Guide helps you build and customize your own ENS subname minting website using our white label starter kit. This template provides a fully functional subname-minting website that you can deploy in minutes and customize to match your brand.
## Prerequisites
* **ENS Name Activation**: Your ENS name must be activated and listed on the Namespace platform
* **Node.js**: Version 16 or higher
* **Git**: For cloning the repository
## Getting Started
To enable subname registrations through your custom website, you first need to **activate your ENS name(s)**. Once activated, others will be able to mint subnames from them.
See the step-by-step guide on how to activate an ENS Name.
Clone the white label starter kit repository:
```bash
git clone https://github.com/thenamespace/subpages.git
cd packages/subname-minting-website-template/
```
Install the required dependencies:
```bash
yarn install
```
Create a `.env` file in the project root with your configuration:
```bash
VITE_APP_LISTED_NAME=yourname.eth
VITE_APP_LISTING_CHAIN=base
VITE_APP_ALCHEMY_TOKEN=your_alchemy_token_here
VITE_APP_DEFAULT_AVATAR=https://your-avatar-url.com
VITE_APP_IS_TESTNET=false
VITE_APP_MINT_SOURCE=your-website
```
Start the development server:
```bash
yarn run dev
```
Your website will be available at `http://localhost:5173`
## Customization
### Theme Customization
The easiest way to customize your website's appearance is through the `theme.json` file. This file contains design variables that control colors, backgrounds, and visual elements.
```json
{
"main": "#0a2943",
"accent": "#309ae0",
"light": "#ffffff",
"dark": "#000000",
"error": "#d80000",
"backgroundImage": "https://your-background-image.com/image.jpg"
}
```
### Default ENS Avatar
You can configure a default avatar for newly minted subnames. This can be your company logo or any image that represents your brand. Users can change this after minting.
### Custom Records
Configure custom text records and address records for your subnames:
* **Text Records**: Add custom metadata like website URLs, social media handles, or descriptions
* **Address Records**: Set default wallet addresses for different chains
Customization for text records and address records can be made in the `MintForm.tsx` component located at `/packages/subname-minting-website-template/src/components/MintForm.tsx`.
The records are configured in the `mintParameters` function call:
```typescript MintForm.tsx lines
const params = await mintParameters({
minterAddress: address,
expiryInYears: expiryYears,
records: {
addresses: addresses,
texts: texts,
},
label: label,
parentName: listedName,
owner: address!,
});
```
Modify the `addresses` and `texts` objects to set your desired default records for newly minted subnames.
## Deployment
Once you're satisfied with your customizations, build and deploy your website:
```bash
yarn run build
```
This creates a `dist` folder containing your production-ready website that you can deploy to any static hosting service like Vercel, Netlify, or GitHub Pages.
## Examples
See these live examples of customized Subpages:
* **OP Punks**: [oppunk.namespace.ninja](http://oppunk.namespace.ninja)
* **PizzaDAO**: [pizzadao.namespace.ninja](http://pizzadao.namespace.ninja)
* **SheFi**: [shefi.namespace.ninja](http://shefi.namespace.ninja)
## Get Started
Launch your subname minting website in 5 minutes
# Quickstart
Source: https://docs.namespace.ninja/developer-guide/quickstart
Get started with Namespace subnames.
## Introduction
Namespace provides Subname infrastructure and developer tools for teams to easily build on top of ENS. Namespace allows you to create and manage ENS subnames both offchain and onchain.
{/*
Offchain subnames are gasless and instant and are managed via an API or JS SDK.
Onchain subnames are decentralized on either Ethereum Mainnet or any L2 network, but they are not gasless and instant.
*/}
## Start building
Choose your integration path based on your needs.
Audience: Developers. For a high-level overview and model selection (Offchain vs L2 vs L1), see
Getting started
.
Gasless, instant, flexible. Parent name owner retains control and ownership over subnames. Easy to implement and manage via API or SDK.
Minted onchain as NFTs, on Ethereum or supported L2s (Base and Optimism). Offer more decentralization and ownership rights.
## Build with AI
Use AI to build with Namespace quickly.
Leverage AI to set up your environment and build your ENS integration.
## Namespace Products
Easily mint and manage Onchain or Offchain subnames **without having to write code.**
Mint and manage ENS subnames on L1 or L2 (Base and Optimism) through our app. Set up custom pricing rules for subnames, add whitelists, reservations, or token-gating without writing code.
Create and manage ENS Subnames offchain through our Dev Portal. Add custom records, update the resolver contract, create API keys, and easily implement Subname registrations in your app.
## Dev resources
Use our tutorials and guides to get started integrating Namespace.
Explore our complete API documentation for all endpoints and parameters.
Detailed documentation for our JavaScript SDKs and integration examples.
Join the Namespace Builders group on Telegram
## Community
Join our vibrant community to discuss ideas, get support, and collaborate:
* [Twitter / X](https://x.com/namespace_eth)
* [GitHub](https://github.com/thenamespace)
* [Blog](https://thenamespace.substack.com/)
* [Discord](https://discord.gg/W5pgT3wsnv)
* [Telegram (Builders)](https://t.me/+5FAwyiKOTeswNTIy)
***
# Overview
Source: https://docs.namespace.ninja/developer-guide/sdks/indexer-manager
Indexer Manager is a library for interacting with indexed data from Namespace smart contracts.
## Introduction
The Indexer Manager SDK is a lightweight TypeScript client for reading indexed data produced by Namespace smart contracts on Layer 2 networks. It provides simple, typed methods to read individual subnames, search and paginate subnames, and retrieve registry metadata.
## Supported chains
* Optimism — `10`
* Base — `8453`
* Base Sepolia — `84532`
## Next steps
* Install and configure the SDK: [Installation](/developer-guide/sdks/indexer-manager/installation)
* Read subnames: [Fetch L2 Subnames](/developer-guide/sdks/indexer-manager/fetch-l2-subnames)
* Read registry info: [Fetch L2 Registries](/developer-guide/sdks/indexer-manager/fetch-l2-registries)
# Fetch L2 Registries
Source: https://docs.namespace.ninja/developer-guide/sdks/indexer-manager/fetch-l2-registries
Fetch the information about the deployed NFT registry for an ENS name on a specific L2 network.
## getL2Registry
Fetches the information about the deployed NFT registry for an ENS name on a specific L2 network using its `chainId` and either the name or namehash.
### Usage
```typescript
client.getL2Registry({
chainId: 10,
nameOrNamehash: "oppunk.eth",
});
```
### Return Type
```typescript
export interface L2RegistryResponse {
name: string; // ENS name (e.g., "example.eth")
owner: string; // Address of the registry owner
tokenSymbol: string; // Symbol of the ERC-721 token (e.g., "OPN")
tokenName: string; // Name of the ERC-721 token (e.g., "Oppunk Names")
tokenAddress: string; // Address of the subname contract on L2
is_expirable: boolean; // Whether the subnames have an expiry date
is_burnable: boolean; // Whether the subnames can be burned
chain_id: number; // ID of the L2 network
}
```
### Example
```typescript
const registry = await client.getL2Registry({
chainId: 10,
nameOrNamehash: "oppunk.eth",
});
console.log(registry.tokenSymbol, registry.is_burnable);
```
# Fetch L2 Subnames
Source: https://docs.namespace.ninja/developer-guide/sdks/indexer-manager/fetch-l2-subnames
Fetch a single or multiple L2 subnames.
Indexer has methods for fetching single or multiple L2 subnames.
## 1. **getL2Subname**
The `getL2Subname` method retrieves a single subname registered on an L2 chain.
### Usage
```typescript ENS Name
const response = await client.getL2Subname({
chainId: 10,
nameOrNamehash: "lucas.oppunk.eth",
});
```
```typescript Namehash
const response = await client.getL2Subname({
chainId: 10,
nameOrNamehash: "0x15219d7dc9f1a66f9281d1436a646ed2b4d5e96dcf62db66bffeedd2155c74c0", // namehash for lucas.oppunk.eth
});
```
* `chainId`: The id of the target L2 network (e.g., `base(8453)`, `optimism(10)`, `baseSepolia(84532)`)
* `nameOrNamehash`: Name or namehash representation of an ENS name
### Return Type
```typescript
export interface L2SubnameResponse {
name: string;
namehash: string;
label: string;
parentNamehash: string;
owner: string;
texts: Record;
addresses: Record;
contenthash?: string;
chainId: number;
expiry: number;
mintTransaction?: {
price: number;
paymentReceiver: string;
};
}
```
### Field Description
| Field | Description |
| ----------------- | ------------------------------------------------------------------------------------- |
| `name` | Full subname (e.g., `alice.oppunk.eth`) |
| `namehash` | ENS-compatible namehash of the subname |
| `label` | The label (left-most part) of the subname (e.g., `alice`) |
| `parentNamehash` | Namehash of the parent domain (e.g., `oppunk.eth`) |
| `owner` | Ethereum address of the current owner |
| `texts` | Map of text records associated with the subname |
| `addresses` | Map of address records (coin type → address) |
| `contenthash` | Content hash (e.g., IPFS, Arweave link) |
| `chainId` | Chain ID where the subname is registered (e.g., `8453` for Base, `10` for Optimism) |
| `expiry` | Unix timestamp indicating when the subname will expire (0 for non-expirable subnames) |
| `mintTransaction` | Object describing the minting transaction |
| `price` | Minting price in ETH |
| `paymentReceiver` | Ethereum address that received the mint payment (e.g., `0x1234...abcd`) |
## 2. **getL2Subnames**
The `getL2Subnames` method allows you to retrieve a paginated list of Layer 2 (L2) subnames based on various filter criteria.
### Usage
```typescript Fetch subnames by owner
// Fetch first page of subnames by owner
const byOwner = await client.getL2Subnames({
owner: "0x123400000000000000000000000000000000abcd",
chainId: 10,
page: 0,
size: 10,
});
```
```typescript Search by name substring
// Search by name substring
const search = await client.getL2Subnames({
stringSearch: "hello",
chainId: 8453,
page: 0,
size: 5,
});
```
```typescript Filter by parent domain
// Filter by parent domain
const underParent = await client.getL2Subnames({
parent: "artii.eth",
chainId: 8453,
page: 0,
size: 5,
});
```
### Query Parameters
```typescript
export interface GetL2SubnamesQuery {
owner?: string;
chainId?: number;
page?: number;
size?: number;
parent?: string;
isTestnet?: boolean;
stringSearch?: string;
}
```
### Return Type
```typescript L2SubnamePagedResponse
export interface L2SubnamePagedResponse {
items: L2SubnameResponse[];
total: number;
page: number;
size: number;
}
```
```typescript L2SubnameResponse
export interface L2SubnameResponse {
name: string;
namehash: string;
label: string;
parentNamehash: string;
owner: string;
texts: Record;
addresses: Record;
contenthash?: string;
chainId: number;
expiry: number;
mintTransaction?: {
price: number;
paymentReceiver: string;
};
}
```
# Indexer SDK Installation
Source: https://docs.namespace.ninja/developer-guide/sdks/indexer-manager/installation
Lightweight SDK for interacting with the Namespace Indexer to read indexed data from smart contracts.
You can install the library:
```bash
npm install @thenamespace/indexer-manager
```
```bash
yarn add @thenamespace/indexer-manager
```
```bash
pnpm add @thenamespace/indexer-manager
```
### Usage
```typescript Default
import { createIndexerClient } from "@thenamespace/indexer-manager";
const indexer = createIndexerClient();
```
```typescript Custom Endpoint
import { createIndexerClient } from "@thenamespace/indexer-manager";
// Custom endpoint and timeout
const indexer = createIndexerClient({
indexerUri: "https://indexer.namespace.ninja",
timeout: 15000,
});
```
### Configuration
* indexerUri (optional, string): Base URL of the Indexer service to query. If omitted, the SDK uses its internal default service URL.
* timeout (optional, number): HTTP request timeout in milliseconds. Default is 30000ms.
# Overview
Source: https://docs.namespace.ninja/developer-guide/sdks/mint-manager
TypeScript SDK for minting ENS subnames on Namespace, supporting Mainnet and L2 networks.
`@namespacesdk/mint-manager` is a TypeScript library for minting subnames under names activated on the Namespace platform. It abstracts the complexities of interacting with smart contracts, supporting both Ethereum Mainnet and Layer 2 networks like Base and Optimism. The library uses Viem under the hood for seamless integration.
Easily mint ENS subnames activated on the Namespace platform.
Works with Ethereum Mainnet and Layer 2 networks such as Base and Optimism.
Determine whether a subname is available for minting.
# Get Mint Details
Source: https://docs.namespace.ninja/developer-guide/sdks/mint-manager/get-mint-details
Get the details about minting a single/specific subname under a listed ENS name.
**GetMintDetails** function returns data with details about minting a single/specific subname under a listed ENS name.
### Usage
```typescript
import {
MintDetailsRequest,
MintDetailsResponse,
} from "@namespacesdk/mint-manager";
const request: MintDetailsRequest = {
parentName: "namespace.eth",
label: "superman",
minterAddress: "0x1D84ad46F1ec91b4Bb3208F645aD2fA7aBEc19f8",
expiryInYears: number,
};
const mintDetails: MintDetailsResponse = await mintClient.getMintDetails(
request
);
```
### MintDetailsResponse
The data returned from this function answers the questions:
* What is the total price of minting a given subname?
* Is the minter address allowed to mint a subname?
```typescript
export interface MintDetailsResponse {
canMint: boolean;
estimatedPriceEth: number;
estimatedFeeEth: number;
isStandardFee: boolean;
validationErrors: MintingValidationErrorType[];
}
```
1. **canMint** - Specifies whether a minter address has permission to mint a subname. If this is false, see validationErrors for the reason.
2. **estimatedPriceEth** - The price for minting a subname, set by the listing owner.
3. **estimatedFeeEth** - The minting fee for minting a subname.
4. **validationErrors** - If the subname cannot be minted, the validation errors will specify the reason. There could be different reasons, such as: Listing has expired, minter is not whitelisted, minter doesn't have a required token in case listing uses token gated access, etc.
### MintingValidationErrorType
Validation Errors are a standard set of errors that are present when a given subname cannot be minted.
| Error | Description |
| ------------------------- | ----------------------------------------------------------------------- |
| SUBNAME\_TAKEN | Subname not available |
| MINTER\_NOT\_TOKEN\_OWNER | Listing uses Token Gated Access and minter does not hold required token |
| MINTER\_NOT\_WHITELISTED | Listing uses Whitelisting feature and minter is not whitelisted |
| LISTING\_EXPIRED | Listing uses Deadline feature with expiry set |
| SUBNAME\_RESERVED | A subname label is reserved and not mintable |
# Get Mint Transaction Parameters
Source: https://docs.namespace.ninja/developer-guide/sdks/mint-manager/get-mint-transaction-parameters
Generate all the required parameters needed to send a successful transaction and mint a subname on a given chain.
**GetMintTransactionParameters** is a function which generates all the required parameters needed to send a successful transaction and mint a subname on a given chain.
### Usage
```typescript title="index.ts" data-overflow="wrap"
import {
MintTransactionRequest,
MintTransactionResponse,
} from "@namespacesdk/mint-manager";
const request: MintTransactionRequest = {
parentName: "namespace.eth",
label: "superman",
owner: "0x1D84ad46F1ec91b4Bb3208F645aD2fA7aBEc19f8", // optional
minterAddress: "0x1D84ad46F1ec91b4Bb3208F645aD2fA7aBEc19f8",
expiryInYears: 1, // optional
records: {
texts: {
name: "Superman",
avatar: "https://my-avatar-uri",
description: "I am superman",
},
addresses: {
60: "0x1D84ad46F1ec91b4Bb3208F645aD2fA7aBEc19f8",
},
},
};
const response: MintTransactionResponse =
await mintClient.getMintTransactionParameters(request);
```
### MintTransactionRequest
| Parameter | Description | Required |
| ------------- | --------------------------------------------------------------------------- | ------------------------------ |
| parentName | Name of listed ENS name | Yes |
| label | The full subname will be `${label}.${parentName}` | Yes |
| owner | The owner of minted subname NFT | No, defaults to minter address |
| minterAddress | Address of a wallet which is going to perform mint transaction | Yes |
| expiryInYears | For subnames which are expirable, this is where the expiry in years is set. | No, defaults to 1 year |
| records | Text and Address records to be set in the same transaction | No |
### MintTransactionResponse
The response object contains all the needed information that can be used to send a transaction and mint a subname.
```typescript
export interface MintTransactionResponse {
contractAddress: Address;
args: any[];
account: string;
abi: any;
functionName: string;
value: bigint;
}
```
# Mint SDK Installation
Source: https://docs.namespace.ninja/developer-guide/sdks/mint-manager/installation
Learn how to install and initialize the Namespace Mint SDK for minting ENS subnames.
Install the required packages, depending on your package manager:
```bash
npm install @namespacesdk/mint-manager@latest viem
```
```bash
yarn add @namespacesdk/mint-manager@latest viem
```
Create an instance of mint client with a proper configuration:
```typescript
import {
MintClientConfig,
createMintClient,
MintClient,
} from "@namespacesdk/mint-manager";
const TOKEN = process.env.ALCHEMY_TOKEN;
const clientConfig: MintClientConfig = {
isTestnet: false,
customRpcUrls: {
[mainnet.id]: `https://eth-mainnet.g.alchemy.com/v2/${TOKEN}`,
[base.id]: `https://base-mainnet.g.alchemy.com/v2/${TOKEN}`,
},
mintSource: "my-perfect-app",
};
const mintClient: MintClient = createMintClient(clientConfig);
```
### MintClientConfig
| Parameter | Default | Description |
| ------------- | ------------- | ---------------------------------------------------------------------------------------------------------------------------------------------------------------------------------------------- |
| isTestnet | false | Specifies whether the testnet app is used or not. |
| customRpcUrls | undefined | Sets a map of chain.id - rpc urls that a mint client is going to use when making external calls. If the rpc url is not specified, the client will default to a public client for a given chain |
| mintSource | namespace-sdk | When a subname is minted, the mint event also emits a source parameter which is useful to track where the subname mints are coming from |
# Check Subname Availability
Source: https://docs.namespace.ninja/developer-guide/sdks/mint-manager/is-subname-available
Determine if a specific ENS subname is available for minting.
**IsSubnameAvailable** function is used to check for the availability of a subname before minting is attempted. Subnames which are already registered cannot be minted.
### IsL1SubnameAvailable
Used to check the availability of a subname when minting happens on the L1 Chain.
```typescript
public async isL1SubnameAvailable(
subname: string,
): Promise
```
### IsL2SubnameAvailable
Used to check the availability of a subname when minting happens on the L2 Chain.
```typescript
public async isL2SubnameAvailable(
subname: string,
chainId: number
): Promise
```
# Overview
Source: https://docs.namespace.ninja/developer-guide/sdks/offchain-manager
TypeScript library for managing offchain subnames, text records, and data records in an ENS system with gasless operations.
The Offchain Manager SDK is a TypeScript library for managing offchain subnames, text records, and data records in an ENS system with gasless operations.
## Key Features
* **Gasless Operations**: Create and manage subnames without blockchain transactions
* **Text Records**: Set and retrieve text-based records (email, website, etc.)
* **Data Records**: Store and retrieve structured data records
* **Address Records**: Manage cryptocurrency addresses and multi-chain support
* **Chain Name Support**: Handle cross-chain naming conventions
* **Batch Operations**: Efficiently manage multiple subnames and records
* **TypeScript Support**: Full type safety and IntelliSense support
### Record Types
Store human-readable information like email addresses, websites, social media profiles, and custom metadata.
Store cryptocurrency addresses for different chains and coins.
Store structured data in various formats including JSON, IPFS hashes, and custom schemas for filtering.
# Address Records
Source: https://docs.namespace.ninja/developer-guide/sdks/offchain-manager/address-records
Learn how to add, update, and delete blockchain address records associated with ENS subnames.
These methods allow you to add, update, or delete blockchain address records associated with a subname.
Supported Chains: Check the ChainName page for the list of supported blockchain networks.
### 1. addAddressRecord
The `addAddressRecord` method adds or updates an address record for the specified subname on the given blockchain network.
### Usage Example
```typescript
client.addAddressRecord({
subname: "ns.myensname.eth",
chain: ChainName.Ethereum,
value: "0x0123...",
});
```
* `subname`: The full ENS subname (e.g., `"ns.myensname.eth"`).
* `chain`: A value from the `ChainName` enum representing the target blockchain.
* `value`: The address to associate with the subname for the specified chain.
### 2. deleteAddressRecord
The `deleteAddressRecord` method removes an address record for a specific blockchain from a given subname.
* `subname`: The full ENS subname.
* `chain`: The blockchain network whose address record should be removed.
Note: Removing an address record will disassociate the
blockchain address from the subname but does not affect other records.
### Usage Example
```typescript
client.deleteAddressRecord({
subname: "ns.myensname.eth",
chain: ChainName.Ethereum,
});
```
# Supported Chains
Source: https://docs.namespace.ninja/developer-guide/sdks/offchain-manager/chainname
Learn about the ChainName enum and how it maps to the appropriate coin types.
Address records on the ENS side are stored according to the [SLIP-0044](https://github.com/satoshilabs/slips/blob/master/slip-0044.md) specification.\
This library provides an abstraction over those records by exposing a `ChainName` enum, which internally maps to the appropriate coin types.
**Currently Supported Chains**
```typescript
export enum ChainName {
Ethereum = "eth",
Solana = "sol",
Arbitrum = "arb",
Optimism = "op",
Base = "base",
Polygon = "polygon",
Bsc = "bsc",
Avalanche = "avax",
Gnosis = "gnosis",
Zksync = "zksync",
Cosmos = "cosmos",
Near = "near",
Linea = "linea",
Scroll = "scroll",
Bitcoin = "btc",
Starknet = "starknet",
Sui = "sui",
Unichain = "unichain",
Berachain = "berachain",
WorldChain = "world_chain",
Zora = "zora",
Celo = "celo",
Aptos = "aptos",
Algorand = "algorand",
}
```
If the chain you need is not listed above, feel free to reach out to us on [Telegram](https://t.me/+5FAwyiKOTeswNTIy) we’ll be happy to add support as soon as possible. Alternatively, you can [open an issue](https://github.com/thenamespace/namespacesdk/issues) on our GitHub repository.
# Create or Update Subname
Source: https://docs.namespace.ninja/developer-guide/sdks/offchain-manager/create-update-subname
Create new ENS subnames or update existing ones, including text and address records, metadata, and more.
### Creating a Subname
Label: The label of the subname follows the ENS naming convention. It follows UTS-51 encoding and can include emojis. See ENSIP-15 for more details.
Use `createSubname` to add a subname under an existing ENS name.\
You can include text records, address records, and metadata.
```typescript
import { ChainName } from "@thenamespace/offchain-manager";
client.createSubname({
label: "subname",
parentName: "example.eth",
texts: [
{ key: "avatar", value: "avatar url..." },
{ key: "name", value: "superman" },
],
addresses: [
{ chain: ChainName.Ethereum, value: "0x123..." },
{ chain: ChainName.Bitcoin, value: "qgds..." },
],
owner: "0x123...",
metadata: [{ key: "sender", value: "0x123..." }],
});
```
Include the owner
field when creating a subname. This allows you to later fetch all subnames owned by a specific address using the SDK or API.
### Parameters
* `label`: Subname label (e.g., `"subname"` for `subname.example.eth`)
* `parentName`: Parent ENS name
* `texts`: Array of key-value text records. (optional)
* `addresses`: Array of address records. (optional)
* `metadata`: Array of key-value metadata. It can be used to filter out the subnames later. (optional)
* `contenthash`: Content hash (optional)
* `owner`: Owner address (optional)
* `ttl`: Time-to-live. (optional)
## Updating a Subname
Use `updateSubname` to modify text records, address records, content hash, or metadata for an existing subname.
```typescript
client.updateSubname("superman.namespace.eth", {
texts: [{ key: "avatar", value: "updated-avatar" }],
});
```
### Parameters
* `texts`: Array of text records to update (optional)
* `addresses`: Array of address records to update (optional)
* `metadata`: Array of key-value metadata to update. It can be used to filter out the subnames later. (optional)
* `contenthash`: New content hash (optional)
* `ttl`: Time-to-live (optional)
The ChainName
enum maps blockchain networks to their [SLIP-0044](https://github.com/satoshilabs/slips/blob/master/slip-0044.md) coin types for address records. See the [ChainName](/developer-guide/sdks/offchain-manager/chainname) page for more details.
# Metadata Records
Source: https://docs.namespace.ninja/developer-guide/sdks/offchain-manager/data-records
Manage custom key-value metadata records for ENS subnames. Useful for discovery and filtering operations.
## Overview
Metadata records are custom key-value pairs you can attach to an offchain ENS subname. They are not used for onchain ENS resolution but are useful for discovery and filtering (e.g., via `getFilteredSubnames`) because they are indexed in the Namespace offchain service.
Do not store sensitive or private information in metadata records. Values are retrievable by anyone with read access to the subname's metadata.
## Methods
### 1. addDataRecord
Adds or updates a metadata record for the specified subname.
#### Usage Example
```typescript
try {
await client.addDataRecord({
subname: "ns.myensname.eth",
key: "token-holder",
data: "1200", // number of tokens held by the owner
});
console.log("Metadata saved.");
} catch (error) {
// Handle network, auth, or validation errors
console.error("Failed to add data record:", error);
}
```
* `subname`: The full ENS subname (e.g., `"ns.myensname.eth"`).
* `key`: Case-sensitive metadata key (e.g., `"token-holder"`).
* `data`: Value to store for the key (string).
If the key already exists, its value will be overwritten.
### 2. deleteDataRecord
Deletes a data record from the subname.
#### Usage Example
```typescript
try {
await client.deleteDataRecord({
subname: "ns.myensname.eth",
key: "token-holder",
});
console.log("Metadata key deleted.");
} catch (error) {
console.error("Failed to delete data record:", error);
}
```
* `subname`: The full ENS subname.
* `key`: The metadata key to delete.
### 3. getDataRecords
Returns all data records of the provided subname as a key-value map.
#### Usage Example
```typescript
const allMetadata = await client.getDataRecords("ns.myensname.eth");
// allMetadata: Record
```
#### Return Type
```typescript
type DataRecords = Record;
```
##### Example Result
```json
{
"token-holder": "1200",
"segment": "pro",
}
```
### 4. getDataRecord
Returns the requested data record for the provided subname and key.
#### Usage Example
```typescript
const response = await client.getDataRecord("ns.myensname.eth", "token-holder");
const data = response.record; // "1200"
```
#### Return Type
```typescript
export interface GetRecordResponse {
record: string;
}
```
* `record`: The value associated with the requested key.
# Delete Subname
Source: https://docs.namespace.ninja/developer-guide/sdks/offchain-manager/delete-subname
Permanently remove an ENS subname and all associated records using the Offchain SDK.
Use `deleteSubname` to permanently remove a subname and all its records.
```typescript
client.deleteSubname("ns.myensname.eth");
```
Deleting a subname is irreversible. All associated text records, address
records, and content hash will be removed.
# Initialize API Key
Source: https://docs.namespace.ninja/developer-guide/sdks/offchain-manager/generate-api-key
Learn how to generate and configure API keys for Namespace Offchain SDK operations, including address-based and domain-specific keys.
To interact with the offchain system, you'll need an API key. You can configure your API key either for all domains associated with an address (recommended) or for specific ENS domains.
### Get API Key from Namespace Dev Portal
Guide on how to get an API key from the Namespace Dev Portal.
## Configuring Your API Key
Works with all ENS domains registered to your address:
```typescript
import { createOffchainClient } from "@thenamespace/offchain-manager";
// During initialization
const client = createOffchainClient({
mode: "mainnet",
defaultApiKey: "your-address-based-api-key"
});
// Or after initialization
const client = createOffchainClient();
client.setDefaultApiKey("your-address-based-api-key");
```
Works with specific ENS domains only:
```typescript
import { createOffchainClient } from "@thenamespace/offchain-manager";
// During initialization
const client = createOffchainClient({
mode: "mainnet",
domainApiKeys: {
"example.eth": "your-domain-api-key",
"test.eth": "another-domain-key"
}
});
// Or after initialization
const client = createOffchainClient();
client.setApiKey("example.eth", "your-domain-api-key");
```
## API Key Types
* **Address-based API key**: Works with all ENS domains registered to your address
* **Domain-based API key**: Works with a specific ENS domain only
## Priority Order
1. Domain-specific API key (if set)
2. Default address-based API key
# Get Filtered Subnames
Source: https://docs.namespace.ninja/developer-guide/sdks/offchain-manager/get-filtered-subnames
Retrieve a list of subnames using flexible filters such as label, owner, metadata, and pagination.
Retrieve subnames using filters like label search, owner, metadata, and pagination.
## Usage
```typescript
client.getFilteredSubnames({ parentName: "myensname.eth", metadata: { "sender": "0x123..." }, });
```
## Request Parameters
```typescript
export interface QuerySubnamesRequest {
parentName?: string;
parentNames?: string;
labelSearch?: string;
page?: number;
size?: number;
metadata?: Record;
owner?: string;
}
```
* `parentName` or `parentNames`: ENS name(s) to search under (**required**)
* `labelSearch`: Substring to match subname labels (optional)
* `page`: Page number for pagination (default: 1)
* `size`: Number of items per page (optional)
* `metadata`: Metadata key-value filters (optional)
* `owner`: Filter by Ethereum address (optional)
You must provide either `parentName` or `parentNames`.
## Response
Current page number.
Number of items per page.
Total number of items matching the query.
Array of subname objects.
Unique identifier for the subname record.
Fully-qualified ENS name (e.g., alice.example.eth
).
Parent ENS name.
Label portion of the subname (e.g., alice
).
Text records associated with the subname.
Address records keyed by chain name or coin type.
Custom metadata key-value pairs.
Content hash if set.
ENS namehash of the subname.
Ethereum address of the owner, if present.
### Example
```json
{
"page": 1,
"size": 2,
"totalItems": 42,
"items": [
{
"id": "01J9Q3TF3C2Z2S2X9K0V3Q6Y2B",
"fullName": "ns.myensname.eth",
"parentName": "myensname.eth",
"label": "ns",
"texts": { "name": "Namespace" },
"addresses": { "60": "0x1234567890abcdef1234567890abcdef12345678" },
"metadata": { "sender": "0x1234567890abcdef1234567890abcdef12345678" },
"contenthash": null,
"namehash": "0x5f16f2e6b2b3d1e7c3a91e8f27f5b9c3c2b7f6e2a1c0d9e8f6a5b4c3d2e1f0a9",
"owner": "0x1234567890abcdef1234567890abcdef12345678"
},
{
"id": "01J9Q3TH3D4A5B6C7D8E9F0G1H",
"fullName": "blog.myensname.eth",
"parentName": "myensname.eth",
"label": "blog",
"texts": { "url": "https://example.com" },
"addresses": {},
"metadata": {},
"contenthash": "ipfs://bafybeigdyrztxotk3kxne",
"namehash": "0xa9f0e1d2c3b4a5f6e8d9c0a1e2f6b7c2c3b9f5f7e8a1c3d7e1b2b3e6f2f6155f",
"owner": null
}
]
}
```
# Get Single Subname
Source: https://docs.namespace.ninja/developer-guide/sdks/offchain-manager/get-single-subname
Retrieve details for a specific ENS subname by its full name. Returns a single result or null if not found.
Use `getSingleSubname` to fetch a single subname by its fully-qualified name.
## Usage
```typescript
const subname = await client.getSingleSubname("alice.example.eth");
```
Returns null
if the subname doesn't exist.
### Response Fields
Unique identifier for the subname record.
Fully-qualified ENS name (e.g., alice.example.eth
).
Parent ENS name.
Label portion of the subname (e.g., alice
).
Text records associated with the subname.
Address records keyed by coin type (SLIP-44) or chain identifier.
Custom metadata key-value pairs.
Content hash if set.
ENS namehash of the subname.
Owner address, if present.
Optional TTL in seconds.
Creation timestamp (ISO 8601).
Last update timestamp (ISO 8601).
### Example Response
```json
{
"id": "01J9Q4YF7V3M8K2P9N6D1R4T7C",
"fullName": "alice.example.eth",
"parentName": "example.eth",
"label": "alice",
"texts": { "name": "Alice", "url": "https://example.com" },
"addresses": { "60": "0x1234567890abcdef1234567890abcdef12345678" },
"metadata": { "sender": "0x1234567890abcdef1234567890abcdef12345678" },
"contenthash": null,
"namehash": "0xa9f0e1d2c3b4a5f6e8d9c0a1e2f6b7c2c3b9f5f7e8a1c3d7e1b2b3e6f2f6155f",
"owner": "0x1234567890abcdef1234567890abcdef12345678",
"ttl": 3600,
"createdAt": "2025-08-21T12:34:56.000Z",
"updatedAt": "2025-08-21T13:45:12.000Z"
}
```
## Notes
* Returns `null` when the subname cannot be found.
* For bulk queries or filtering by `owner`, `label`, or `metadata`, see `getFilteredSubnames`.
# Offchain SDK Installation
Source: https://docs.namespace.ninja/developer-guide/sdks/offchain-manager/installation
Learn how to install and initialize the Namespace Offchain SDK for managing ENS subnames and records.
Install the Offchain SDK using your preferred package manager:
```bash
npm install @thenamespace/offchain-manager
```
```bash
yarn add @thenamespace/offchain-manager
```
## Creating a Client
To interact with the Offchain SDK, create a client instance. You can obtain your API key from [https://dev.namespace.ninja](https://dev.namespace.ninja).
```typescript
import { createOffchainClient } from "@thenamespace/offchain-manager";
// Defaults to mainnet
const client = createOffchainClient();
client.setDefaultApiKey("your-address-based-api-key");
```
```typescript
import { createOffchainClient } from "@thenamespace/offchain-manager";
const client = createOffchainClient({
mode: "sepolia"
});
```
```typescript
import { createOffchainClient } from "@thenamespace/offchain-manager";
const client = createOffchainClient({
mode: "sepolia",
defaultApiKey: "your-address-based-api-key"
});
```
```typescript
import { createOffchainClient } from "@thenamespace/offchain-manager";
const client = createOffchainClient({
mode: "sepolia",
domainApiKeys: {
"example.eth": "your-domain-based-api-key",
"test.eth": "another-domain-key"
}
});
```
### Configuration Options
* `mode`: Network mode - choose between "mainnet" for production or "sepolia" for testing
* `timeout`: Request timeout in milliseconds (optional)
* `defaultApiKey`: Address-based API key for all domains registered to your address
* `domainApiKeys`: Object mapping specific ENS domains to their API keys
# Check Subname Availability
Source: https://docs.namespace.ninja/developer-guide/sdks/offchain-manager/is-subname-available
Determine if a specific ENS subname is available for registration.
Use `isSubnameAvailable` to check if a subname can be registered.
```typescript
const response = client.isSubnameAvailable("ns.myensname.eth");
const isAvailable = response.isAvailable; // true if the subname is available, false if already taken.
```
#### Parameters
* `subname`: Subname to check availability for (e.g., `"ns.myensname.eth"`)
#### Return Type
* `isAvailable`: `true` if the subname is available, `false` if already taken.
Always check subname availability before attempting to create or update a subname.\
It may overwrite the existing subname.
# Text Records
Source: https://docs.namespace.ninja/developer-guide/sdks/offchain-manager/text-records
Manage text records for a given ENS subname.
Text records are key-value pairs that can be used to store any arbitrary data associated with a name. Think of this as a user's digital backpack utilized for the storage of preferences, public details, and more.
These methods allow you to manage text records for a given ENS subname. You can fetch, add, update, or delete individual records.
### 1. addTextRecord
Adds or updates a text record for the specified subname.
### Usage Example
```typescript
client.addTextRecord({
subname: "ns.myensname.eth",
key: "description",
value: "HODL ENS!",
});
```
* `subname`: The full ENS subname.
* `key`: The key for the text record (e.g., `"description"`).
* `value`: The value to associate with the key.
### 2. deleteTextRecord
Deletes a text record from the specified subname.
### Usage Example
```typescript
client.deleteTextRecord({ subname: "ns.myensname.eth", key: "description" });
```
* `key`: The key of the text record to delete.
* `subname`: The full ENS subname.
### 3. getTextRecords
Retrieves all text records associated with the specified subname.
### Usage Example
```typescript
client.getTextRecords("ns.myensname.eth");
```
Returns a `Record` mapping each text record key to its value.
### 4. getTextRecord
Retrieves a specific text record from a subname by key.
### Usage Example
```typescript
const response = await client.getTextRecord("ns.myensname.eth", "description");
const description = response.record;
```
#### Return Type
```typescript
export interface GetRecordResponse {
record: string;
}
```
* `record`: The value associated with the requested key.
# Overview
Source: https://docs.namespace.ninja/developer-guide/sdks/overview-sdk
Namespace offers different SDKs to interact with the Namespace backend APIs and smart contracts for ENS subname management.
# SDK
The Namespace SDK is a TypeScript library designed to simplify ENS Subname registration and management in Web3 projects. It enables seamless interaction with Namespace backend APIs and smart contracts, supporting subnames on L2 chains (Base, Optimism, etc.) and Offchain Subnames. The SDK is ideal for projects offering Subname-as-a-Service or integrating subname features into decentralized apps, DAOs, or blockchain tools.
SDK packages include:
Manage offchain subnames with ease.
Simplify minting processes for subnames.
Efficiently manage indexer operations.
# Getting started
Source: https://docs.namespace.ninja/getting-started
What subnames are, how to use them, and where to begin
## ENS Namespace
[ENS](https://ens.domains/) turns long 0x addresses into memorable names like `alice.eth`. Subnames extend a parent name (e.g., `brand.eth`) to create usernames for people, apps, and agents — like `alice.brand.eth`.
[Namespace](https://namespace.ninja/) allows builders to easily **implement Subname registrations** in their apps, wallets, chains, AI agents, or communities. Subnames function across wallets, apps, and chains, serving as an identity layer to enhance user experience, safety, and streamline onboarding.
## Who is this for?
Embed subnames in your wallet, app, or L2 to improve UX and safety.
Launch, list, and sell subnames with no code using the Namespace App.
Start building with our SDKs/APIs.
## Choosing where subnames live
There are 3 key ways to issue subnames. Use this guide to pick the right approach for you.
Offchain subnames are simple database records and work by leveraging [CCIP-read](https://eips.ethereum.org/EIPS/eip-3668). Best for large-scale issuance, require no gas fees to create, flexible ownership controls, and simple API/SDK management. Great default for most apps.
Step-by-step guide
L2 subnames are minted as NFTs on supported L2s (Base, Optimism for now, but could be deployed on any L2). Lower costs than L1 with stronger decentralization and ownership.
Step-by-step guide
L1 subnames are fully decentralized, unruggable, and 100% under the users' control once minted. Minted on the Ethereum mainnet at a higher cost. Fits premium, low-volume cases.
Step-by-step guide
## Subname Use Cases and Benefits
Discover who is using ENS Subname in Web3 and what for.
* **L2 chain** → consistent ecosystem naming and discovery with one namespace.
* **Wallets** → Branded wallet names (human-readable names instead of addresses).
* **Payment apps** → Simple names for sending/receiving payments.
* **AI agents** → Each agent gets a sovereign, unique, verifiable ENS ID/profile.
* **Launchpads** → Auto-assign subnames to every contract or AI agent created.
* **RaaS providers** → Chain-wide naming service for every rollup.
* **Blockchain infra/tools** → Adds a universal identity layer for developers.
* **Wallet-as-a-Service** → One wallet name that works across all chains.
* **Games** → Custom player usernames with cross-chain utility.
* **Identity apps/services** → Use ENS as the foundation for digital identity.
* **Communities** → Subnames for members, strengthening shared identity.
* **Individuals** → Creators give subnames to followers for onboarding.
* **All others** → Any user-facing app needs names as identity primitives.
* **Universal identity** → One name works across apps, wallets, and blockchains.
* **Trust & safety** → Reduces errors, scams, and copy-paste risks.
* **Scam protection** → No phishing, address spoofing, clipboard hijacking, etc.
* **Simplified Onboarding** → Users get onboarded simply by registering a username.
* **New revenue streams** → Premium names, renewals, subname activations.
* **Referrals** → Domains and subdomains used as trackable referral links.
* **Portability** → Identity you own, not locked to any app or chain.
* **Brand Visibility** → People wear their *name*.base.eth as their social handle.
* **Social identity** → Communities distribute branded names
* **Cross-app interoperability** → ENS usernames resolve across 1,000+ web3 apps
* **Onchain Profile** → ENS + metadata (avatar, social handles, website, addresses...)
* **Immutable websites** → Decentralized, censorship-resistant website (contenthash)
## Next steps
Launch and manage subnames without code.
Build with our SDKs and APIs.
Send us a message and let's build something together.
# Learn more
Source: https://docs.namespace.ninja/learn-more
Learn more about Namespace
## What is ENS
To understand Namespace, you have to be familiar with ENS first.
The Ethereum Name Service ([ENS](https://app.ens.domains/)) is the open, decentralized naming protocol that transforms long, unreadable blockchain addresses (e.g., 0xKm3w\...Ko17) into simple, human-readable names (e.g., *alice*.eth). Built on Ethereum, ENS serves as a universal identity layer across Web3, resolving to wallet addresses, smart contracts, websites, and metadata, while giving users ownership and control over their names as NFTs. ENS enables safer transactions, easier onboarding, and more consistent digital identities across wallets, dapps, L2s, and services, making it a core piece of Ethereum’s infrastructure and the foundation for decentralized identity on the internet. [Learn more](https://docs.ens.domains/learn/protocol).
## What is Namespace
Namespace is the leading infrastructure provider for **ENS subnames**. With products designed for scale, we make it easy to launch branded subnames both **onchain or offchain**. Namespace enables **wallets, rollups, AI agents, payment apps, communities**, and others to give their users human-readable .*eth* names as identities—replacing long hexadecimal wallet addresses with simple, recognizable, and universally resolvable names. As the [official ENS Service Provider](https://www.tally.xyz/gov/ens/proposal/20404686300257550242704646761273386459664655640264490428281621095220078268383), Namespace is already powering millions of resolutions and hundreds of thousands of active subnames across Web3. We make Web3 identity simple, scalable, and accessible for every builder in the Web3 space.
## What are ENS subnames?
ENS turns long 0x addresses into memorable names like `alice.eth` and Subnames extend a parent name (e.g., `brand.eth`) to create usernames for people, apps, and agents — like `alice.brand.eth`. Namespace allows builders to easily **implement Subname registrations** in their apps, products, or communities. Subnames function across wallets and apps, serving as an identity solution to enhance safety and streamline onboarding. [Learn more](user-guide/subpages.mdx).
## ENS is multichain
ENS protocol was built to work across chains and ecosystems. Names/domains are minted on Ethereum, but they resolve in 1,000+ apps, and support 100+ chains, and the protocol is extensible by design, so it can support a million more chains.
ENS names have '*address records*' which store addresses from different chains. If you look at the example above (thecap.eth), it has Solana and BTC addresses next to EVM addresses (Eth, Base, Zksync, etc.). So you can send \$BTC to 'thecap.eth' name if the wallet you're using correctly reads/resolves address records from thecap.eth (which most of them do).
Just **One Universal Username**, storing all blockchain addresses the user needs, used as a central point of Web3 Identity for username-to-username payments.
## Vision
Replace all hexadecimal blockchain addresses with human-readable (ENS-powered) names or subnames and streamline ENS implementation across the entire Web3 space.
## Who do we work with?
* **Wallets** → Branded wallet names (human-readable names instead of addresses).
* **L2 chain** → consistent ecosystem naming and discovery with one namespace.
* **Payment apps** → Simple names for sending/receiving payments.
* **AI agents & launchpads** → Auto-assign a subname to every new AI agent created.
* **RaaS providers** → Chain-wide naming service for every rollup.
* **Wallet-as-a-Service** → One wallet name that works across all chains.
* **Blockchain infra/tools** → Adds a universal identity layer for developers.
* **Website builders** → deploy websites to custom immutable subnames.
* **Referral protocols** → custom subdomains as referral tracking links.
* **Games** → Custom player usernames with cross-chain utility.
* **Identity apps/services** → Use ENS as the foundation for digital identity.
* **Communities** → Subnames for members, strengthening shared identity.
* **Individuals** → Creators give subnames to followers for onboarding.
* **All others** → Any user-facing app needs names as identity primitives.
## Traction
* 110,000 subnames minted
* 3M+ resolution requests served
* 200+ names activated (registries deployed)
* 120+ ENS Widgets created
* 30+ partnerships and integrations done
Check out live Namespace stats
## Let's work together
We’re partnering with wallets, rollups, AI projects, payment apps, web3 communities, and others to bring ENS-powered identities to their users.
**Let’s build the identity layer of the decentralized internet together.**
# For ENS name owners, creators, and communities
Source: https://docs.namespace.ninja/overview/for-name-owners
Launch, list, and sell subnames with no code
## Overview
Turn your ENS name into a namespace users can mint from. Set pricing, reservations, allowlists, or token gating.
## What you can do
* Activate your ENS name on L1 or L2
* Sell or gift subnames
* Reserve premium names or blocklist words
* Manage records (text, addresses, avatar, contenthash)
## Get started without code
Create, list, and manage subnames from a web app
## Want help?
We provide support and custom solutions for launches and migrations.
# For product teams & platforms
Source: https://docs.namespace.ninja/overview/for-product-teams
How wallets, apps, and L2s can leverage subnames
## Overview
Use subnames to onboard users with a name (not an address), improve payment safety, and provide cross-app identity.
## Common use cases + benefits
* **Wallets**: branded usernames for every wallet
* **Payments**: safer send/receive with human-readable names
* **L2/Platform identity**: ecosystem-wide names (e.g., `user.chain.eth`)
* **Communities**: names for members or holders
* **AI agents**: unique, verifiable identities for agents and services
- **AI launchpads** → Auto-assign subnames to every new AI agent created.
- **Website builders** → use .eth subnames to deploy free decentralized websites.
- **Websites** → .eth domains resolve to decentralized, censorship-resistant websites.
- **RaaS providers** → Chain-wide naming service for every rollup.
- **Blockchain infra/tools** → Adds a universal identity layer for developers.
- **Wallet-as-a-Service** → One wallet name that works across all chains.
- **Games** → Custom player usernames with cross-chain utility.
- **Identity apps/services** → Use ENS as the foundation for digital identity.
- **L2 chains** → unified chain-wide identity under one .eth name as a root zone.
- **Payment apps** → Venmo-like transacting experience in crypto.
- **Individuals** → Creators give subnames to followers for onboarding.
- **All others** → Any user-facing app needs names as identity primitives.
* **Universal identity** → One name works across apps, wallets, and blockchains.
* **Trust & safety** → Reduces errors, scams, and copy-paste risks.
* **Scam protection** → No phishing, address spoofing, clipboard hijacking, etc.
* **Simplified Onboarding** → Users get onboarded simply by registering a username.
* **New revenue streams** → Premium names, renewals, subname activations.
* **Referrals** → Domains and subdomains used as trackable referral links.
* **Portability** → Identity you own, not locked to any app or chain.
* **Brand Visibility** → People wear their *name*.base.eth as their social handle.
* **Social identity** → Communities distribute branded names
* **Cross-app interoperability** → ENS usernames resolve across 1,000+ web3 apps
* **Onchain Profile** → ENS + metadata (avatar, social handles, website, addresses...)
* **Immutable websites** → Decentralized, censorship-resistant website (contenthash)
## Choose a model
* **Offchain**: gasless, instant, scalable issuance via API/SDK (default)
* **L2**: NFT ownership, lower cost than L1, portable across apps
* **L1**: premium, low-volume scenarios; highest decentralization
## Build paths
Guide to creating offchain subnames with the Namespace SDK
Guide to minting onchain subnames (L1 or L2) with the Namespace SDK.
API Reference
SDK Reference
# Subnames
Source: https://docs.namespace.ninja/overview/subnames
Learn more about Subnames.
[ENS](https://ens.domains/) maps 42-byte addresses to human‑readable .eth names. Subnames extend a parent name (e.g., `brand.eth`) to create subnames for people, apps, and agents — like `alice.brand.eth`.
For a concise overview of how to leverage subnames, how to choose the type of Subnames (Offchain, L2, or L1 subnames), and who uses them, see the Getting started page.
## Different Types of Subnames
ENS subnames can live on L1 or L2 chains, or offchain. L2 and offchain are similar in UX; the key differences are decentralization, cost, and ownership model.
### L1 Subnames
L1 subnames are minted as NFTs directly on Ethereum, offering a fully trustless, decentralized, and permissionless implementation.
When a subname is created through the [ENS Manager app](https://app.ens.domains/), it is registered on Ethereum without burning protective fuses—meaning the parent name still retains certain controls. By contrast, creating a subname via the [Namespace App](https://app.namespace.ninja/) burns a specific set of fuses during the **“**[Name Activation](https://app.namespace.ninja/)**”,** making every subname minted **100% unruggable** and fully controlled by the minter’s address instead of the parent name.
The main drawback of L1 subnames is cost: Ethereum’s high gas fees create friction for high-volume minting, making them less practical for large-scale distribution.
### L2 Subnames
L2 subnames are minted as NFTs on a chosen Layer 2 chain, offering a **trust-minimized solution** that sits between Offchain (fully trustful) and L1 (fully trustless) implementations.
Through the Namespace App, users can already mint subnames on **Base** and **Optimism** from their ENS Names with no coding required. For developers, it’s also possible to link an ENS name on L1 with custom smart contracts deployed on any L2 network. Depending on the implementation, this setup can be made fully trustless while keeping costs for issuing subnames dramatically lower than on the Ethereum mainnet.
Mint, manage, and sell **L1 and L2 subnames** from your ENS name using a user-friendly web app.
### Offchain Subnames
Offchain subnames are stored in centralized databases on private servers, powered by [**CCIP-read**](https://eips.ethereum.org/EIPS/eip-3668). They are ideal for projects that need to issue a large number of subnames to addresses quickly, with no gas fees and with minimal friction.
Implementing and managing offchain names is often as simple as interacting with a REST API, making them easy to deploy at scale. From a user’s perspective, offchain subnames behave just like onchain ones—resolving addresses, text records, and other data with no functional differences since they inherit all properties as any other ENS name or a subname. The only distinction is that they are not minted as NFTs.
With Namespace’s hybrid resolver, offchain subnames can be issued in massive volumes and seamlessly used across apps and platforms.
Create and manage offchain subnames from your ENS name using a user-friendly web app.
# Use Cases
Source: https://docs.namespace.ninja/overview/use-cases
Explore real-world applications of Namespace subnames across wallets, payment apps, AI agents, games, communities, and more.
### **Wallets**
Replace confusing hexadecimal wallet addresses with branded, human-readable ENS subnames (e.g., *alice.****wallet****.eth*). This improves UX, builds brand loyalty, simplifies the onboarding process, and makes daily transacting safer and more intuitive.
### **L2 Chains**
Provide a consistent namespace across the entire chain (e.g., base.eth / [Basenames](https://www.base.org/names)). Every user, dapp, and contract can be named and discovered under the same rootzone (.eth name), enabling builders to use it as a chain-specific naming system and enhance identity within the ecosystem.
### **Payment Apps**
Create a Venmo-like user experience in crypto transacting. Let users send and receive payments with simple names instead of long addresses. ENS subnames reduce errors, increase transaction confidence, and make payments as easy as typing a username.
### **AI Agents & Launchpads**
Automatically assign an ENS subname to every new AI agent at the moment of creation. This gives each agent a sovereign, unique, verifiable, human-readable identity from day one, improving discoverability, interoperability, and user trust.
### **RaaS Providers**
Offer a built-in, chain-wide naming service for every rollup that gets deployed. Branded subnames become the identity layer of the rollup, enhancing UX and enabling frictionless cross-chain username interoperability.
### **Blockchain Infrastructure & Tools**
Add ENS to your plugin/add-on marketplace and allow your developers to implement it as a naming service inside their apps without having to change environments. Universal and composable identity layer for developers and projects.
### **Wallet-as-a-Service Providers**
Issue wallet names that work across all chains and networks, allowing WaaS providers to implement subname-as-a-service and add ENS utility to their stack. This can simplify onboarding for partners and deliver consistent identities to end users.
### **Games**
Assign custom player usernames as ENS subnames, enabling players to carry their gaming identity across ecosystems, wallets, and even outside of the game.
### **Identity Apps & Services**
Use ENS as the backbone for decentralized identity, linking subnames to verifiable credentials, onchain activity, and social profiles—making identity portable across Web3.
### **Communities, Brands**, Memes
Strengthen belonging by issuing subnames to members (e.g., *username.***pepe***.eth*). Shared naming fosters identity, culture, and discoverability across platforms.
### **Individuals/Creators**
Distribute subnames to fans or followers as part of onboarding into their ecosystem.
### All Others
Identity starts with a name. All apps, protocols, or chains need an identity and a naming service.
### Start building
Start issuing subnames
# Overview
Source: https://docs.namespace.ninja/user-guide/app
Namespace App is a no-code interface for Onchain Subnames on L1 and L2 networks.
[Namespace App](https://app.namespace.ninja/) — **onchain hub** for searching, registering, and 'activating' ENS names to let anyone mint onchain subnames.
## What you can do
* [**Search & Register**](/user-guide/app/search-register): Discover and mint ENS names and subnames in the app.
* [**Activate (List) your ENS name**](/user-guide/app/activate-ens-name): Required to enable onchain subname minting.
* After activation, you can:
* Let anyone mint via the app's [Search & Register](/user-guide/app/search-register)
* Let anyone mint via your name (e.g., [https://app.namespace.ninja/\\\*\\\*\[yourname\].eth\\\*\\](https://app.namespace.ninja/\\*\\*\[yourname].eth\\*\\)\*)
* Create an [ENS Widget (no‑code)](/user-guide/app/widget) in the app and embed it on any website
* Launch a custom site ([Subpages, advanced](/developer-guide/guide/subpages)) — see Developer Guide
## Features:
* Customize pricing for subnames
* Rent or sell subnames for a one-time fee
* Reserve or blacklist specific words
* Whitelist wallets to enable minting
* Token-gate subname minting
## Next steps
# Activate an ENS Name
Source: https://docs.namespace.ninja/user-guide/app/activate-ens-name
Activating your ENS name on Namespace allows you and your community to mint subnames on Ethereum, Base, Optimism, and more chains.
To mint subnames from the Namespace platform, ENS Widget, or using our SDK,
you must first activate your ENS Name using the Wizard.
## How to Activate an ENS Name
1. Visit [https://app.namespace.ninja/](https://app.namespace.ninja/).
2. Connect your wallet with the ENS name you want to activate.
3. Click the "Account" icon in the navigation bar.
4. Go to the "Wizard" tab and click "+Activate".
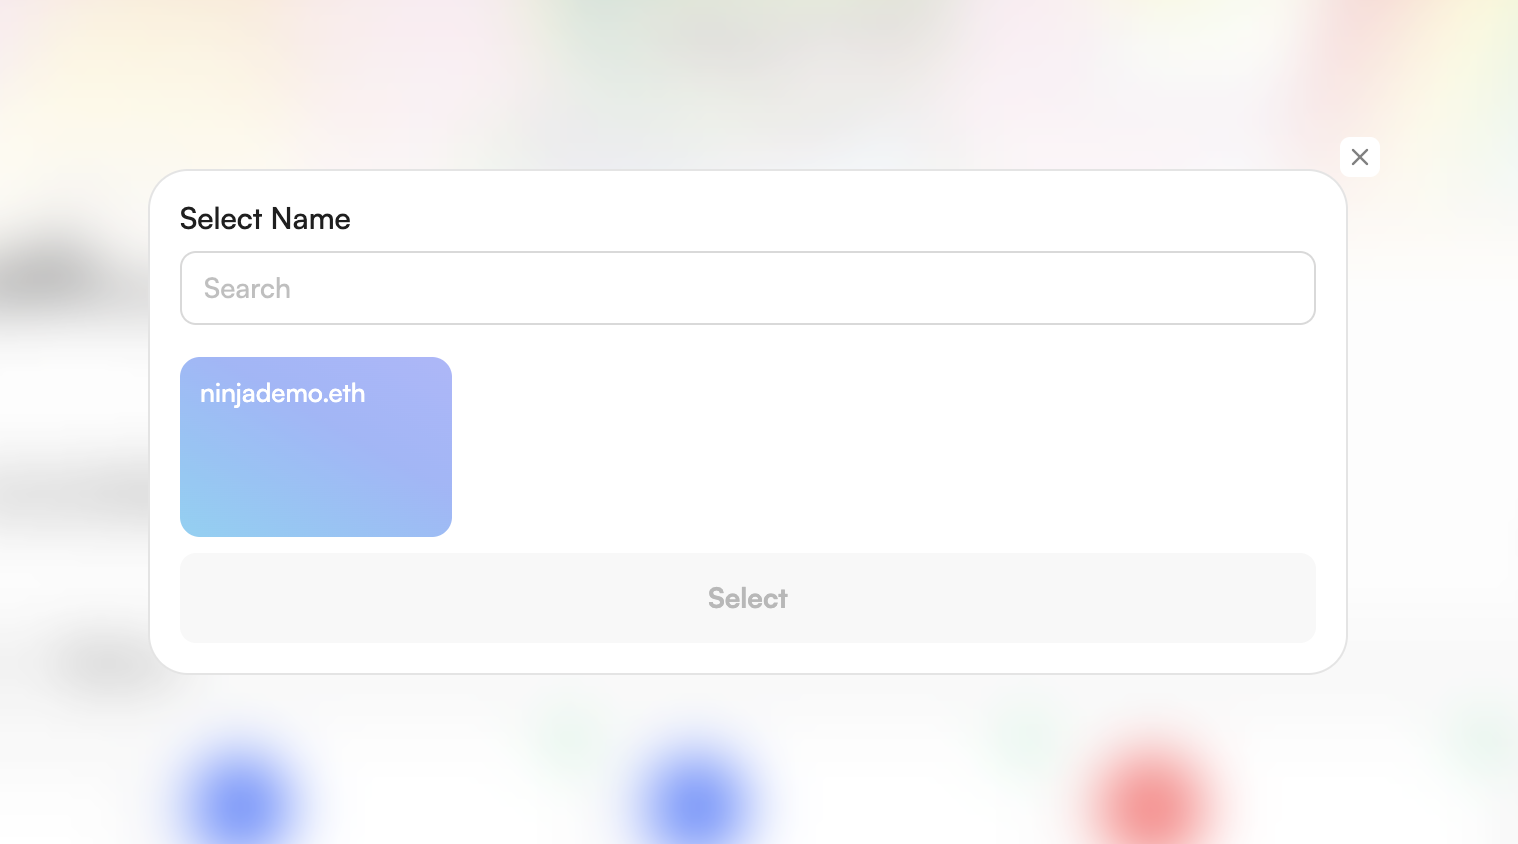
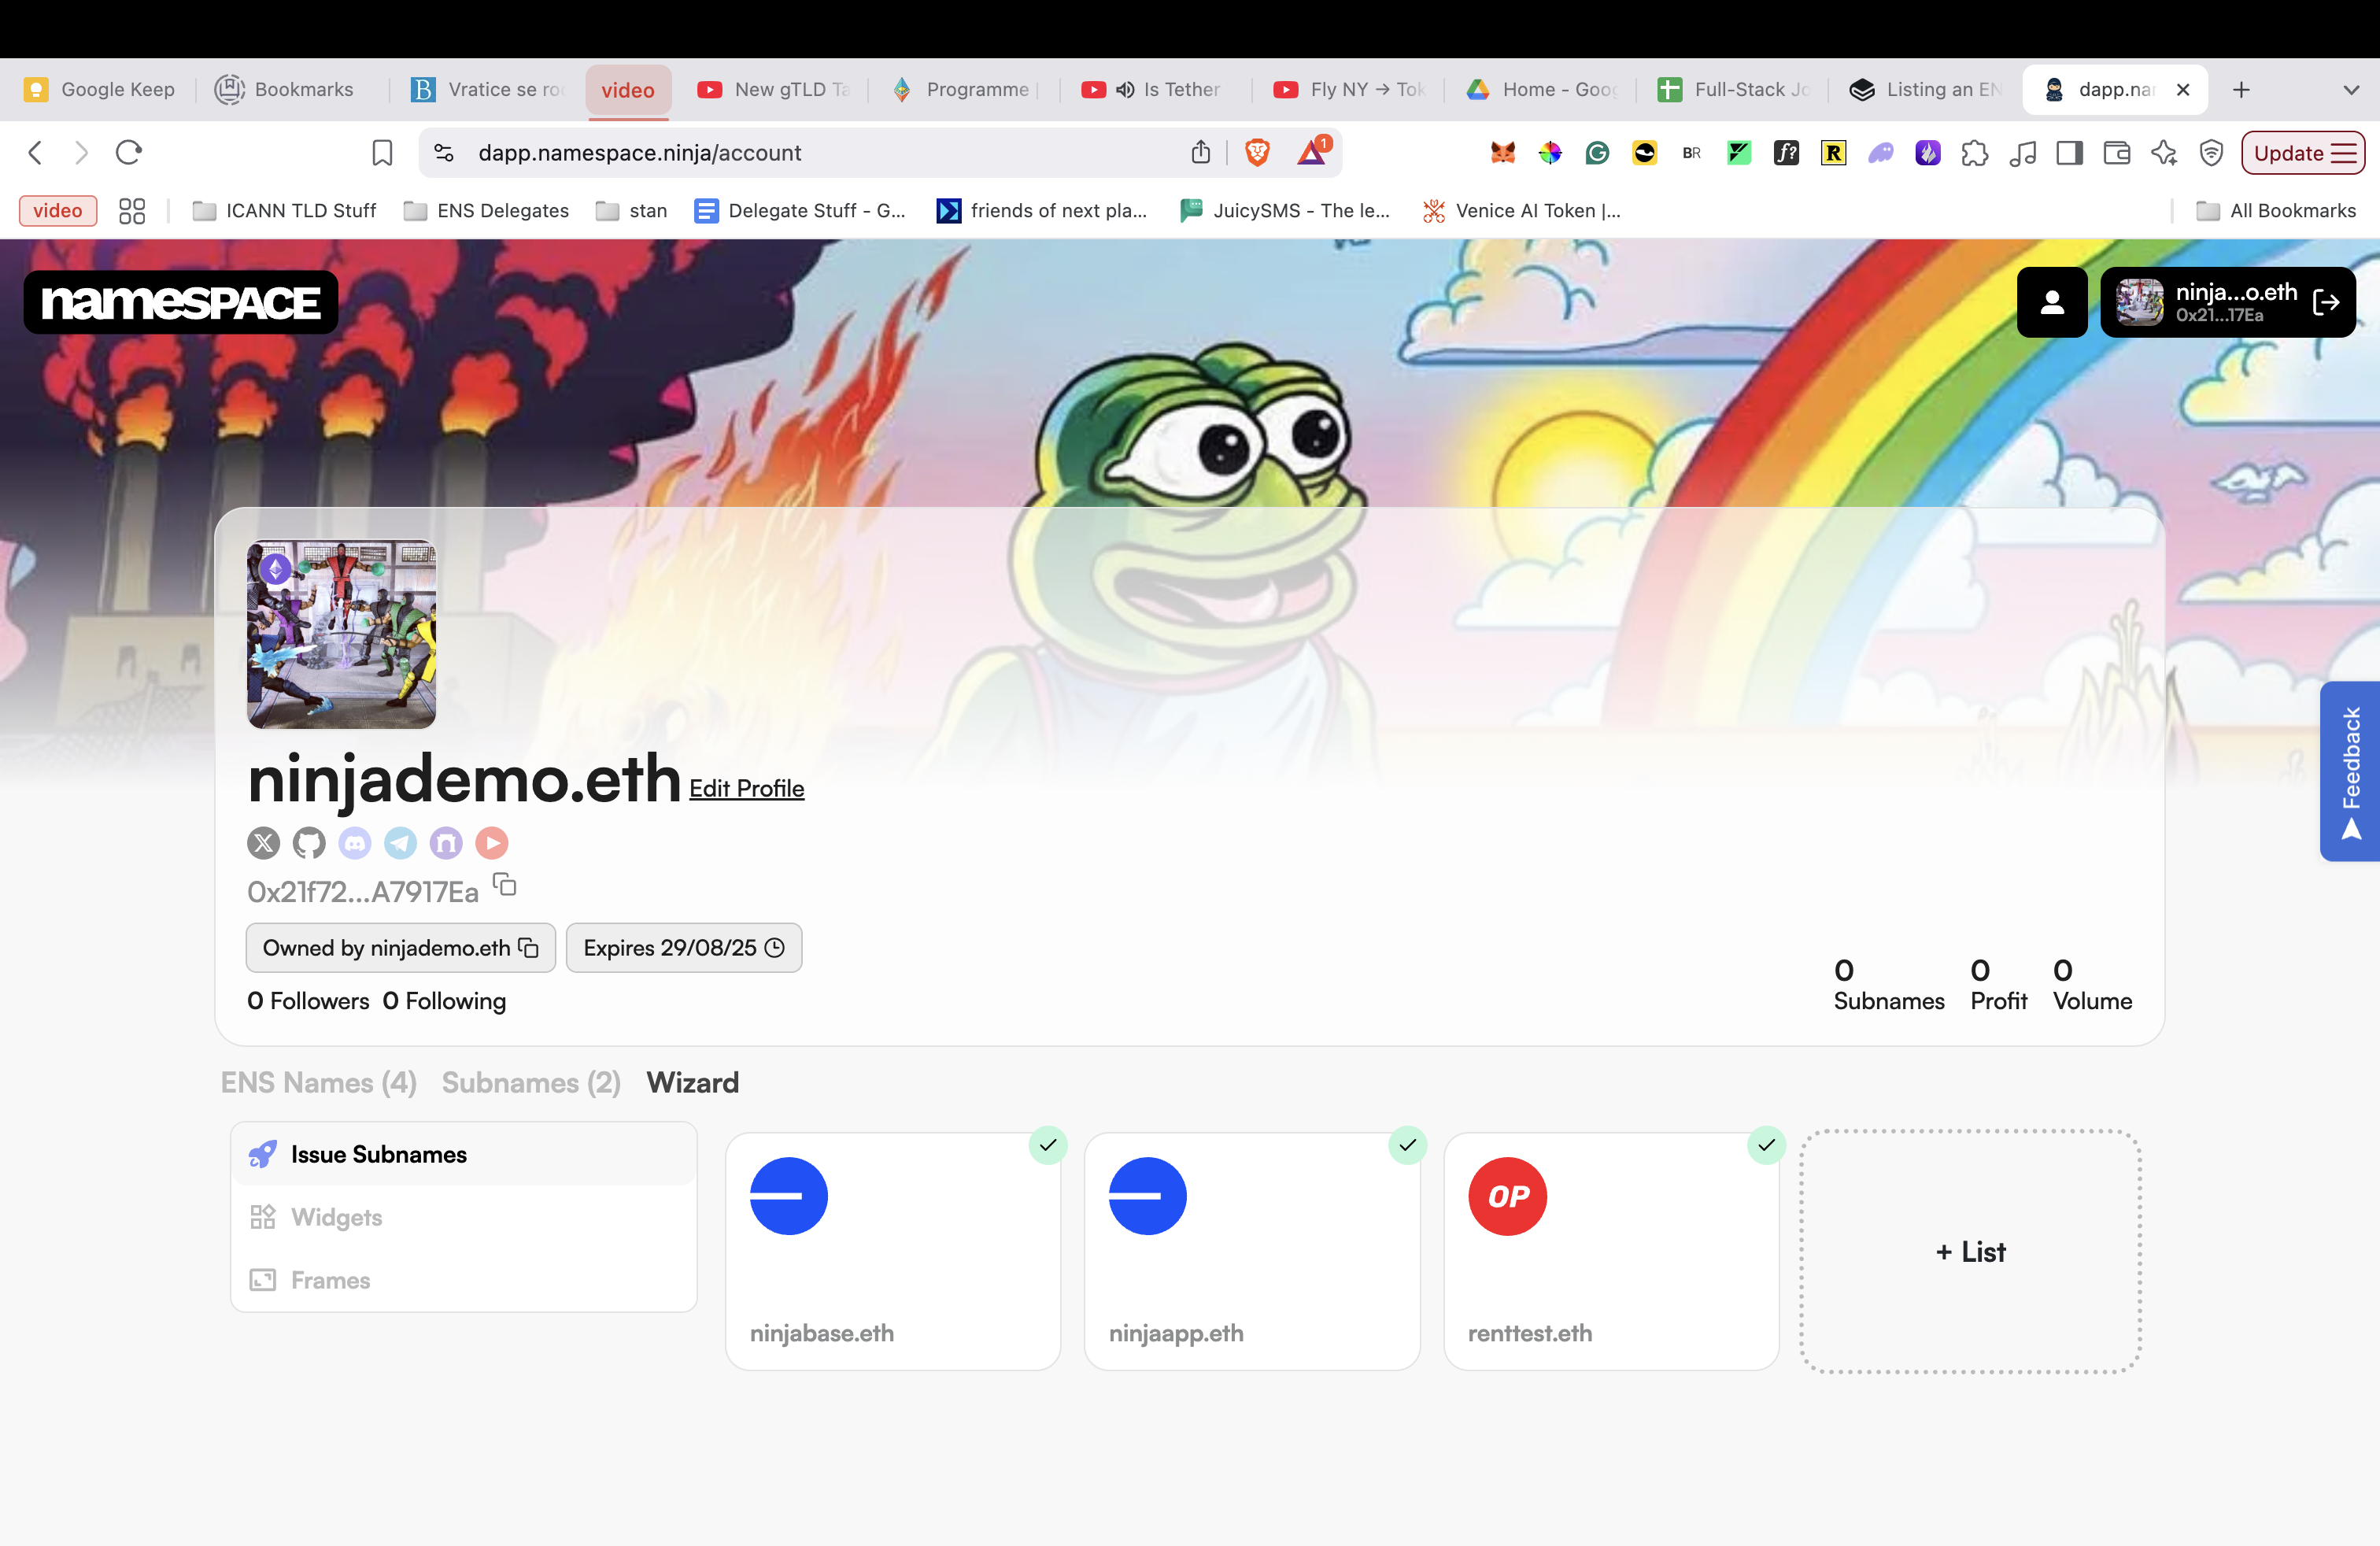
5. Select the ENS name to activate (e.g., `ninjademo.eth`).
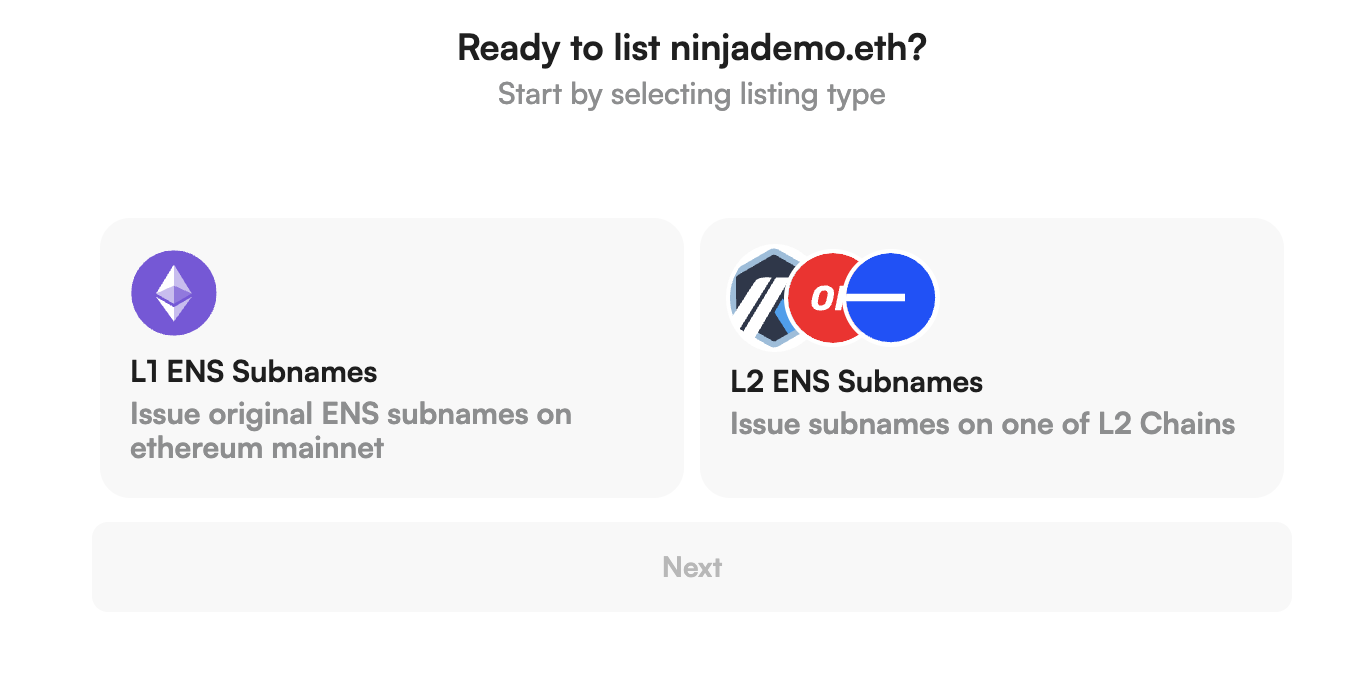
## Choose Activation Option
* **Ethereum:** Issue subnames on Ethereum.
* **L2s (Base, Optimism, etc.):** Issue subnames on supported L2s (example: Base).
We are going to use Base for this example.
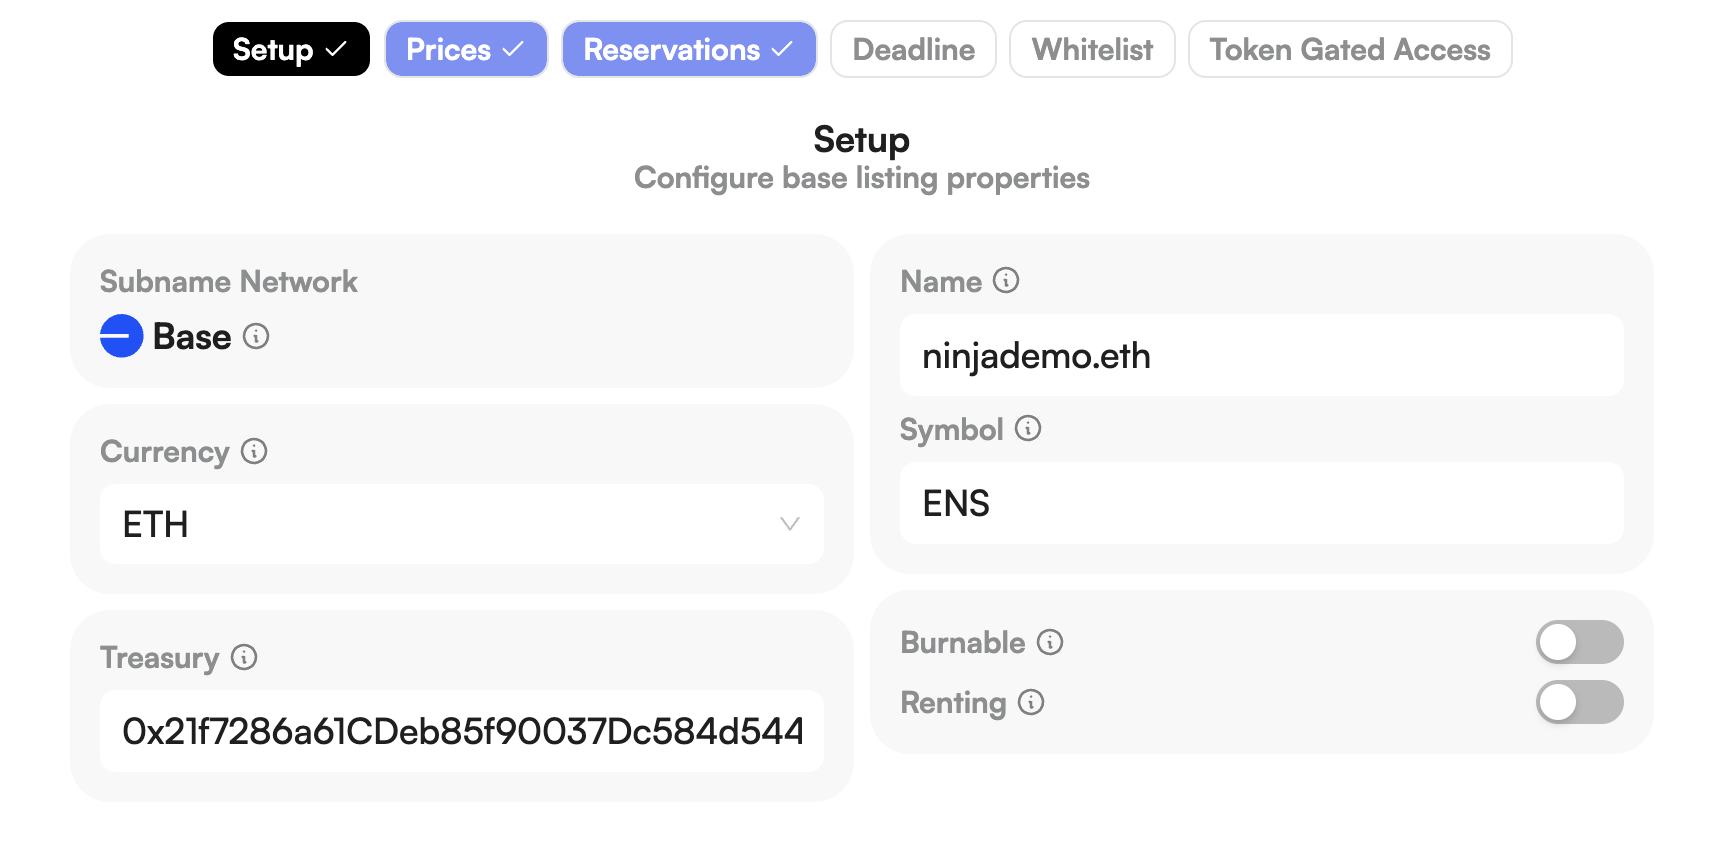
## L2 Activation & Minting Steps
1. Select "Issue L2 Subnames".
* Name your collection and symbol.
* Decide on burnability and rental options.
2. Define minting price for subnames.
* Set base price, length-based pricing, and special rules (numbers, letters, emoji).
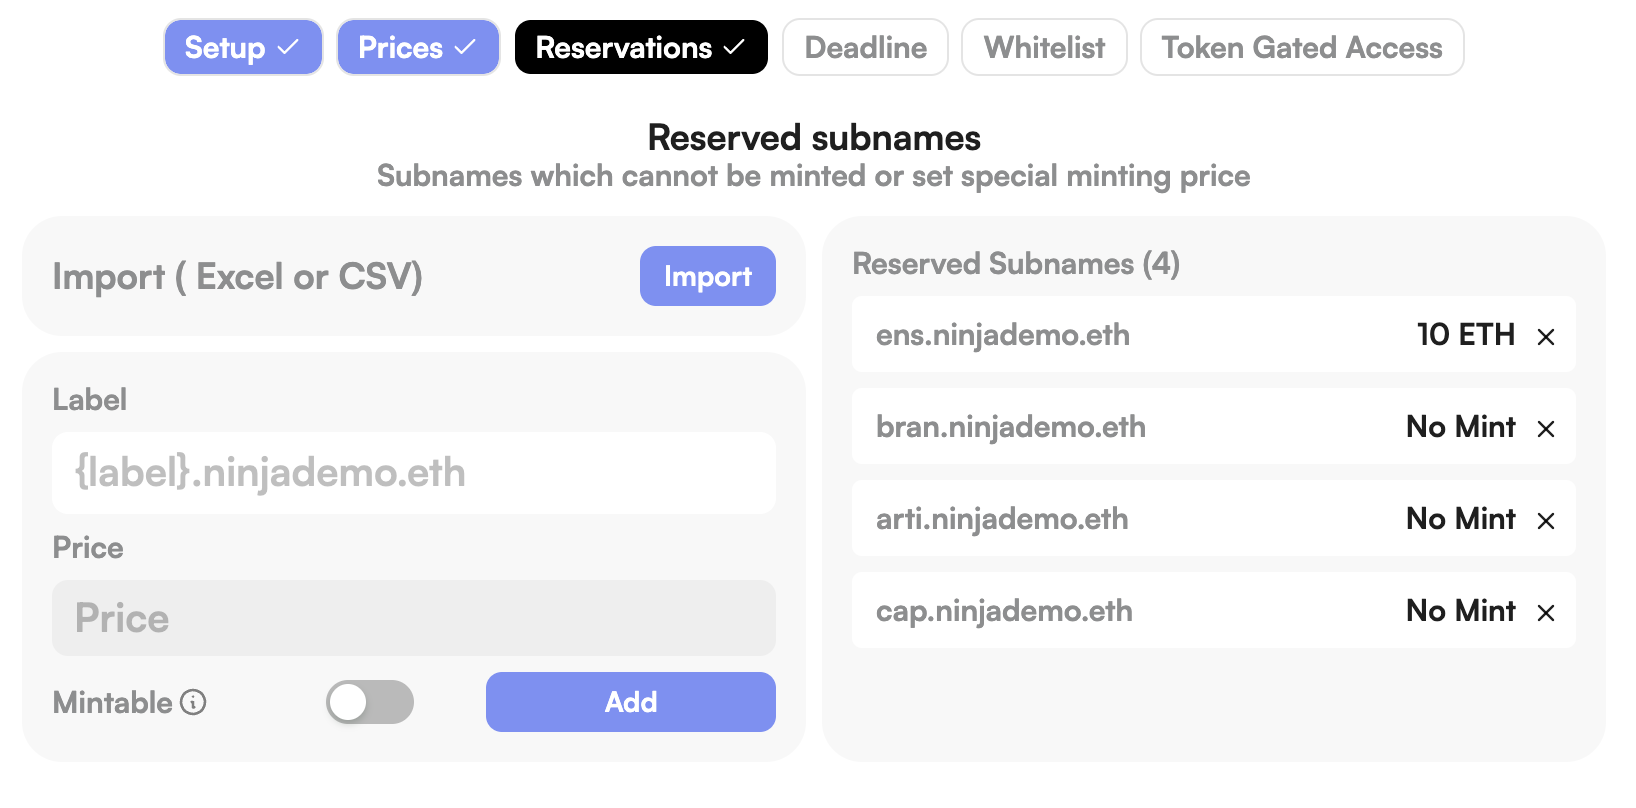
3. Reserve or blacklist subnames as needed.
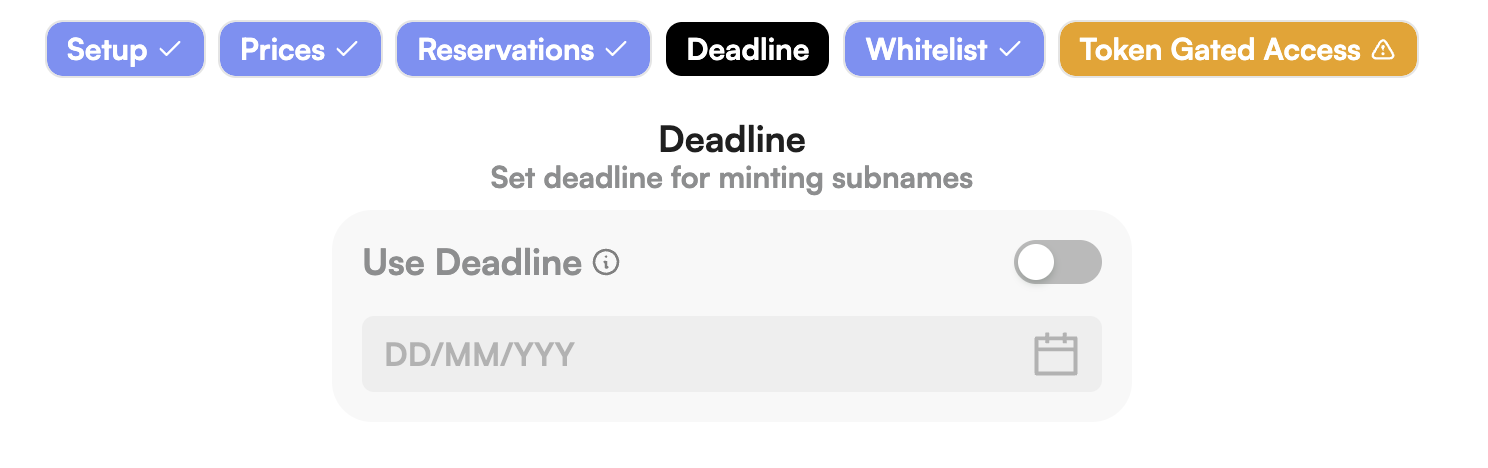
4. Optionally set a minting deadline.
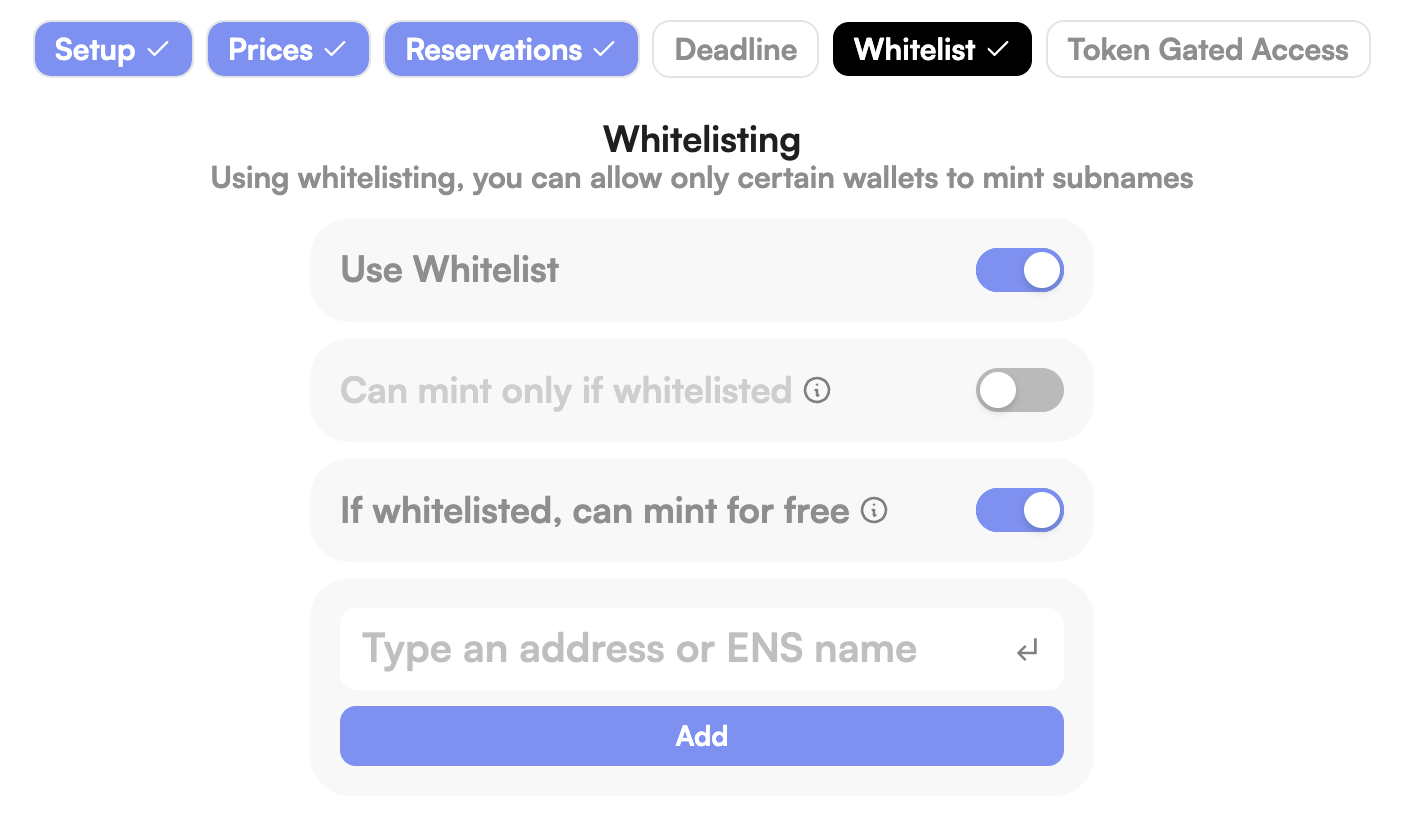
5. Choose whitelisting options. - Restrict
minting to specific wallets or allow free mints for whitelisted addresses.
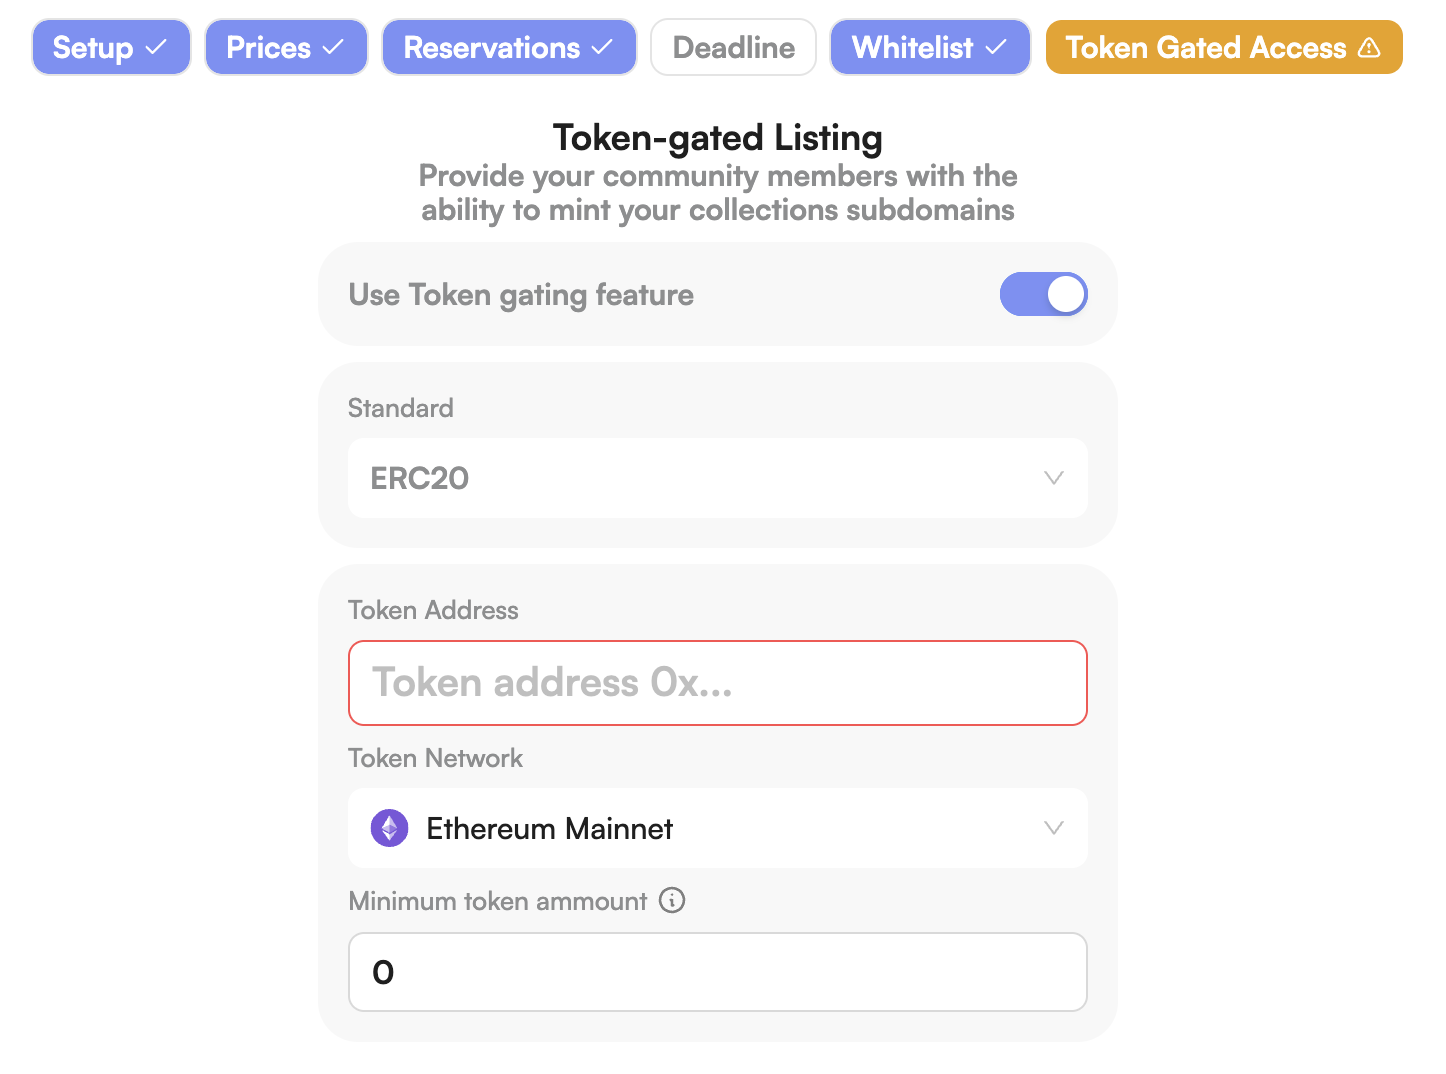
6. Optionally
enable token-gated minting (require ERC20/721 ownership).
***
Once setup is complete, click "List Name". Your ENS Name is now ready for subname minting via:
* [Namespace App](https://app.namespace.ninja/)
* [Widget](./widget)
* [Subpage](https://github.com/thenamespace/subpages) for a custom-branded portal
# Search & Register ENS Subname
Source: https://docs.namespace.ninja/user-guide/app/search-register
Search and registration page allows anyone to buy both ENS names and subnames with expanded search functionality.
The search extends beyond the simple word search. If the searched word (e.g. `alice.eth`) is unavailable, users are presented with additional options.
Imagine you want to register `alice.eth`. Since it's a fairly common name, it's likely already taken. The ENS app doesn't offer additional options to find a similar name or a subname.
With Namespace, however, if the searched word (e.g. `alice.eth`) is unavailable, users are presented with additional options!
If you entered "alice" in the Namespace app, it would give you this:
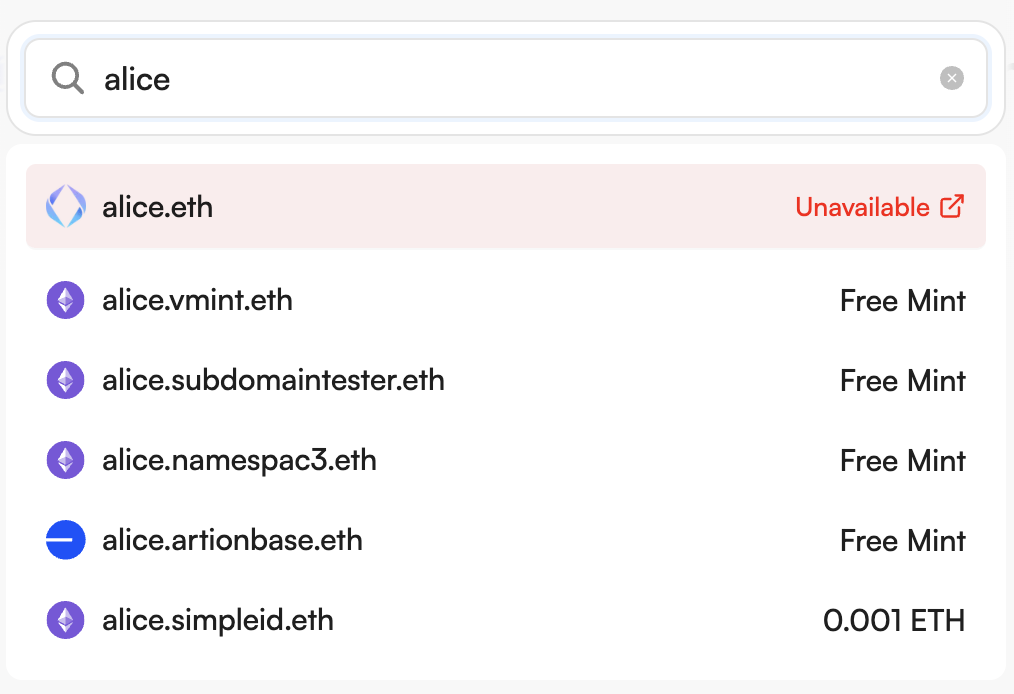
These options are available Subnames of the search word (`alice.eth`) from the parent Names that had been activated on the Namespace platform to issue Subnames, and have that word - `alice` - available.
This expands the registrar's functionality and opens up a lot of potential integrations. Specifically, projects and dapps that need to expand search and registration functionality, such as Website Builders. This allows their users to immediately find and register a domain name/subname for their newly created website.
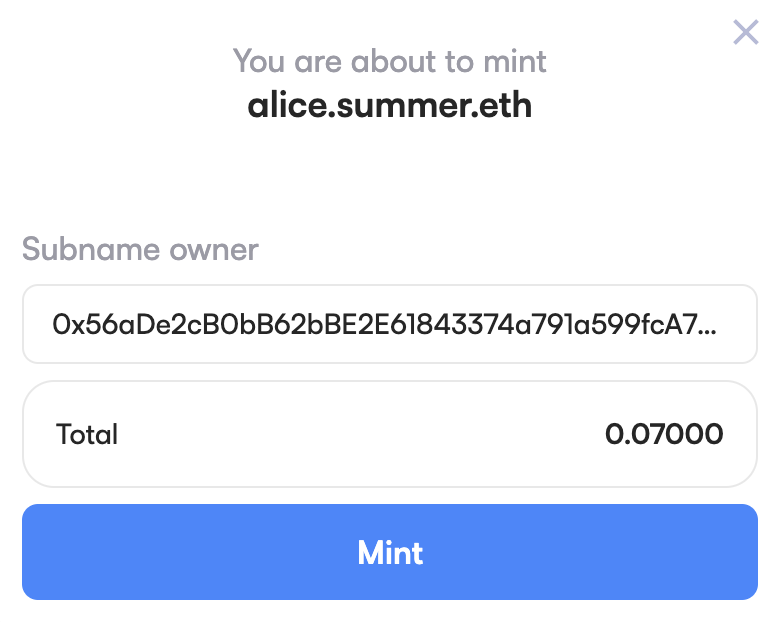
On top of that, each subname comes with certain perks and benefits that the ENS Name owner of the parent Name has decided to provide to incentivize minting.
This provides an additional reason for ENS name owners to come up with creative and appropriate incentives for their Names, and start issuing subnames!
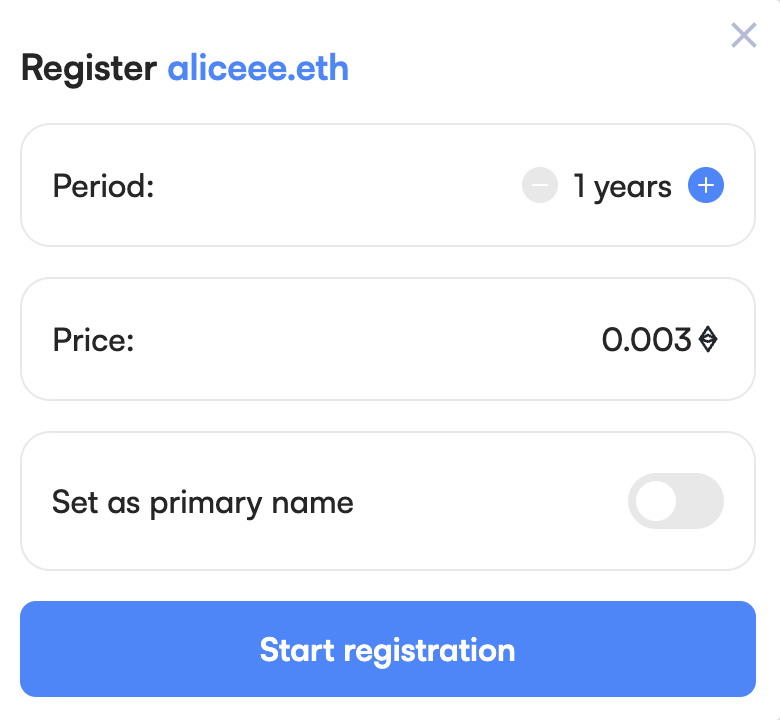
## Registration
Currently, Namespace is the only Dapp that offers **search and registration** of available Subnames from the activated ENS names! This means that it acts as an aggregate of all ENS names and displays the ones that have available subnames that the user wants to register.
The registration process is familiar and easy to use.
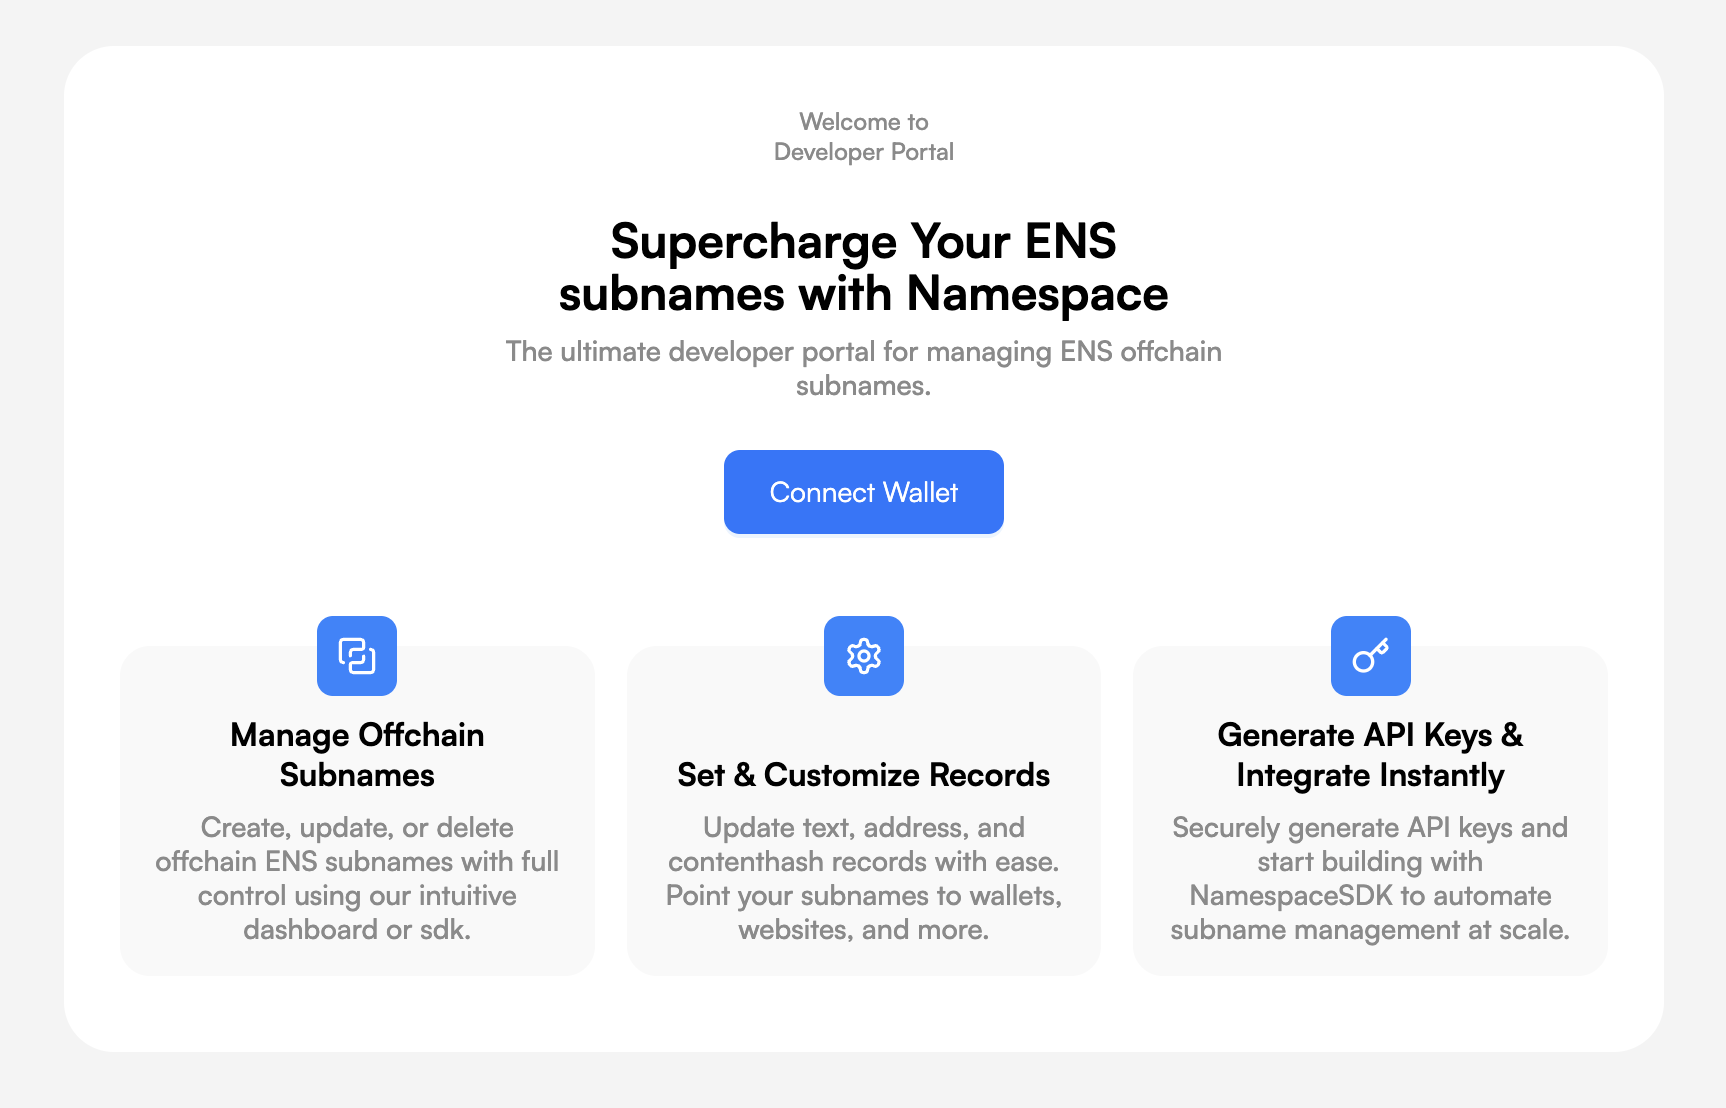
### Registering ENS Name
When registering your ENS Name, you'll be asked:
* Period: The amount of time you wish to register your Name for.
* Price: Amount to be paid for the registration, based on the (sub)name length.
* \[Optional] Set the newly registered name as the primary name.
### Registering ENS Subname
When registering your ENS Subname, you'll see the price for the registration. Since the L1 (Ethereum) subnames are, by default, unruggable, the registration length will be inherited from the parent name. L2 Subnames, however, could optionally have a registration period if the parent-name owner wants to rent subnames instead of selling them for a one-time fee.
# Custom Solution
Source: https://docs.namespace.ninja/user-guide/custom-solutions
We help teams build custom ENS solutions and implementations
Namespace partners with individuals, teams, and companies to design custom ENS Subname solutions and to help people leverage ENS across any use case.
### **We work with:**
* Wallets and WaaS providers
* L2 chains / Rollups / RaaS provider
* Payment providers / processors / apps
* AI agents and launchpads
* Blockchain infra, tools, & service providers
* Identity-related apps and protocols
* Web3 communities, NFT or memecoin projects
* Brands and influencers
* Individuals / ENS enthusiasts
### Wanna build?
Join our TG group and tell us more about it.
# Overview
Source: https://docs.namespace.ninja/user-guide/dev-portal
Dev Portal is a front-end app for Offchain Subnames with developer tools.
[Dev Portal](https://dev.namespace.ninja/) is the central hub for developers integrating ENS subnames into their apps, wallets, rollups, or protocols. It provides the tools, docs, and infrastructure needed to programmatically create, manage, and edit Offchain Subnames, and resolve them across the entire Web3.
## Feature Overview
* **Subname management**: Simple, clean interface to create and manage ENS subnames, records, and all usernames issued.
* **Resolver Set**: Update your ENS name to use the Namespace Hybrid resolver to make all issued subnames fully resolvable across the Web3 ecosystem.
* **API key generation**: Generate an API key and programmatically manage ENS subname creation, issuance, edits, and updates, and easily plug in Subname registrations in your app.
# API Keys
Source: https://docs.namespace.ninja/user-guide/dev-portal/api-keys
Generate and manage API keys for offchain subnames with address-based and domain-based options.
Easily generate an API key to programmatically manage Offchain subnames in your app, and enable Subname registrations in your project on the [Namespace Dev Portal](https://dev.namespace.ninja).
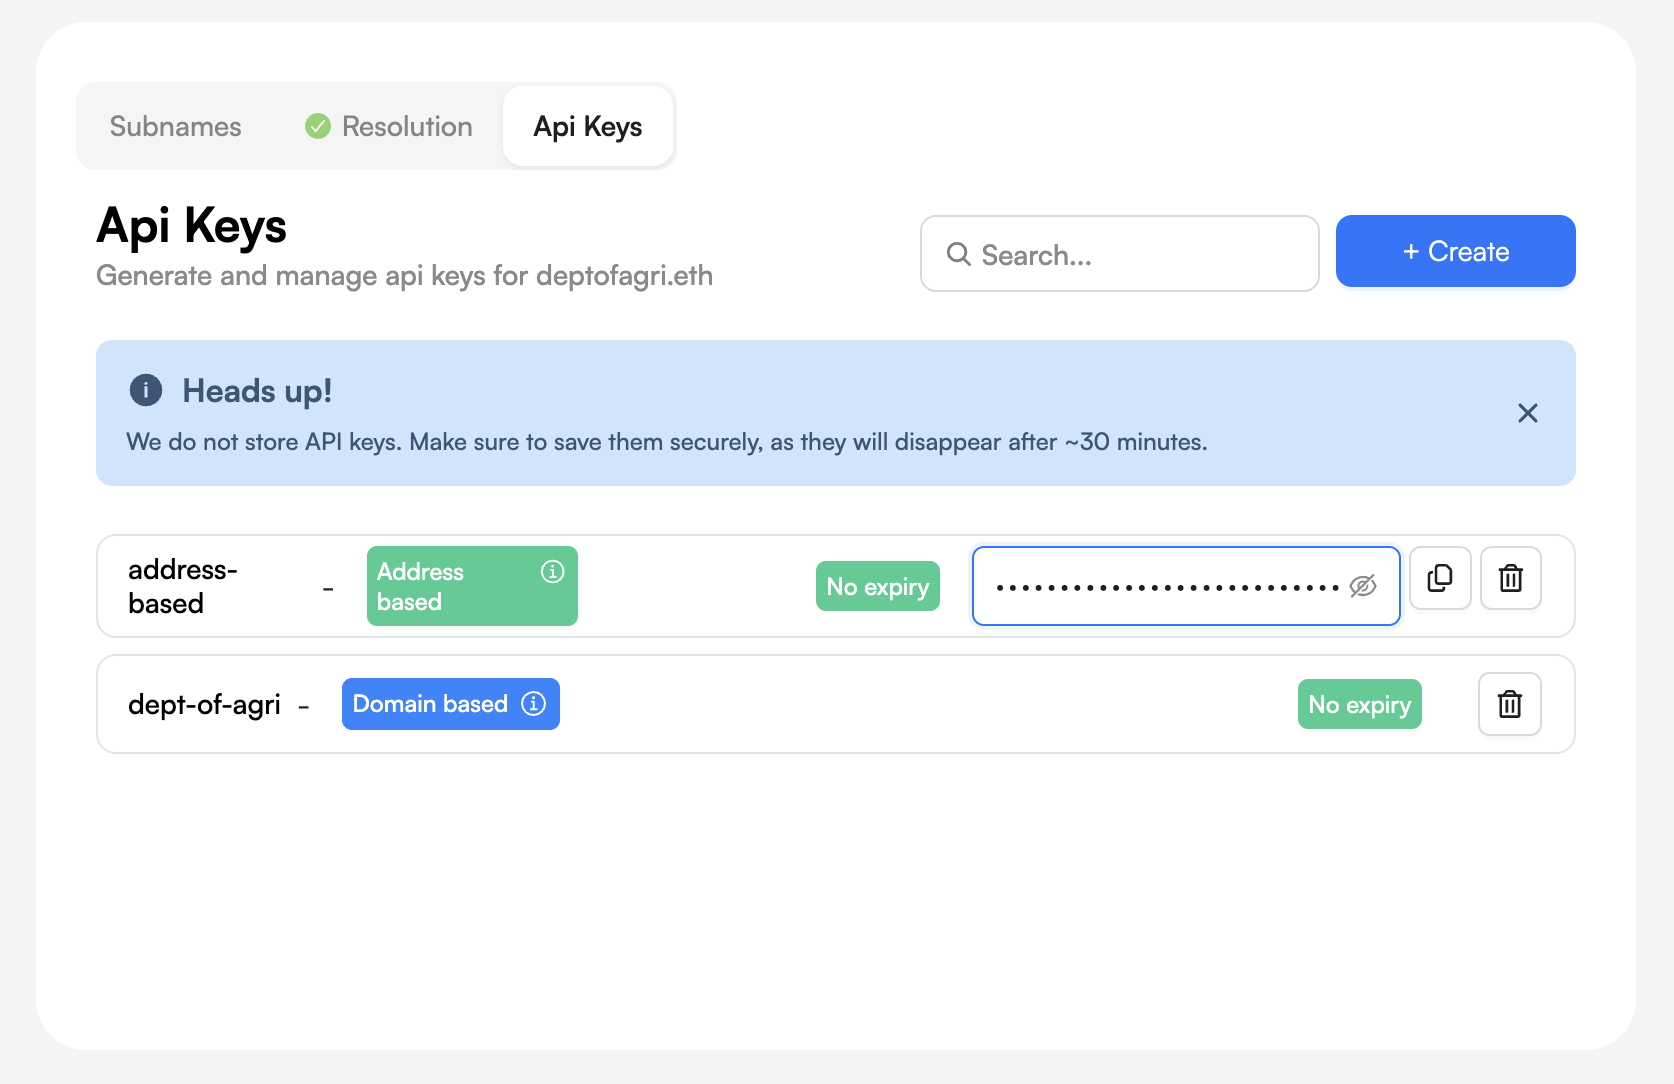
You can issue up to **2,000 Offchain Subnames** (to prevent abuse). Contact us on [Telegram](https://t.me/+5FAwyiKOTeswNTIy) if you’d like to raise your limit — it’s free.
## Two Types of API Keys
### 1. Address-based API Key
* Works for all ENS names owned by your wallet address (one key, all domains)
* Convenient for managing multiple domains with a single key
### 2. Domain-based API Key
* Tied to a specific ENS domain like alice.eth (different keys, different domains)
* Useful for delegating access or using different keys for different domains
## API Key Expiry
You can set an expiry date for your API keys when generating them. This helps you control access and rotate keys for better security. Expired keys will no longer be valid for API requests.
You can always revoke or regenerate your API keys from the Dev Portal for enhanced security.
# Update Resolver
Source: https://docs.namespace.ninja/user-guide/dev-portal/resolver-set
Update your name's resolver to make subnames resolvable in all ENS-supported apps using Namespace's Hybrid resolver.
To make all newly created Offchain Subnames resolvable in all Web3 projects and apps that support ENS resolution, you need to update your parent's name resolver to use Namespace's Hybrid resolver.
Just click the "Update" button, and we'll automatically update your Name's resolver to use ours.
{" "}
# Create Offchain Subnames
Source: https://docs.namespace.ninja/user-guide/dev-portal/subnames
Create and manage offchain subnames including text, address, and content hash records through the UI.
Use the "Subnames" tab to create and manage your offchain subnames for the selected ENS name above. You can add, edit, and update records, including text, address, and content hash records.
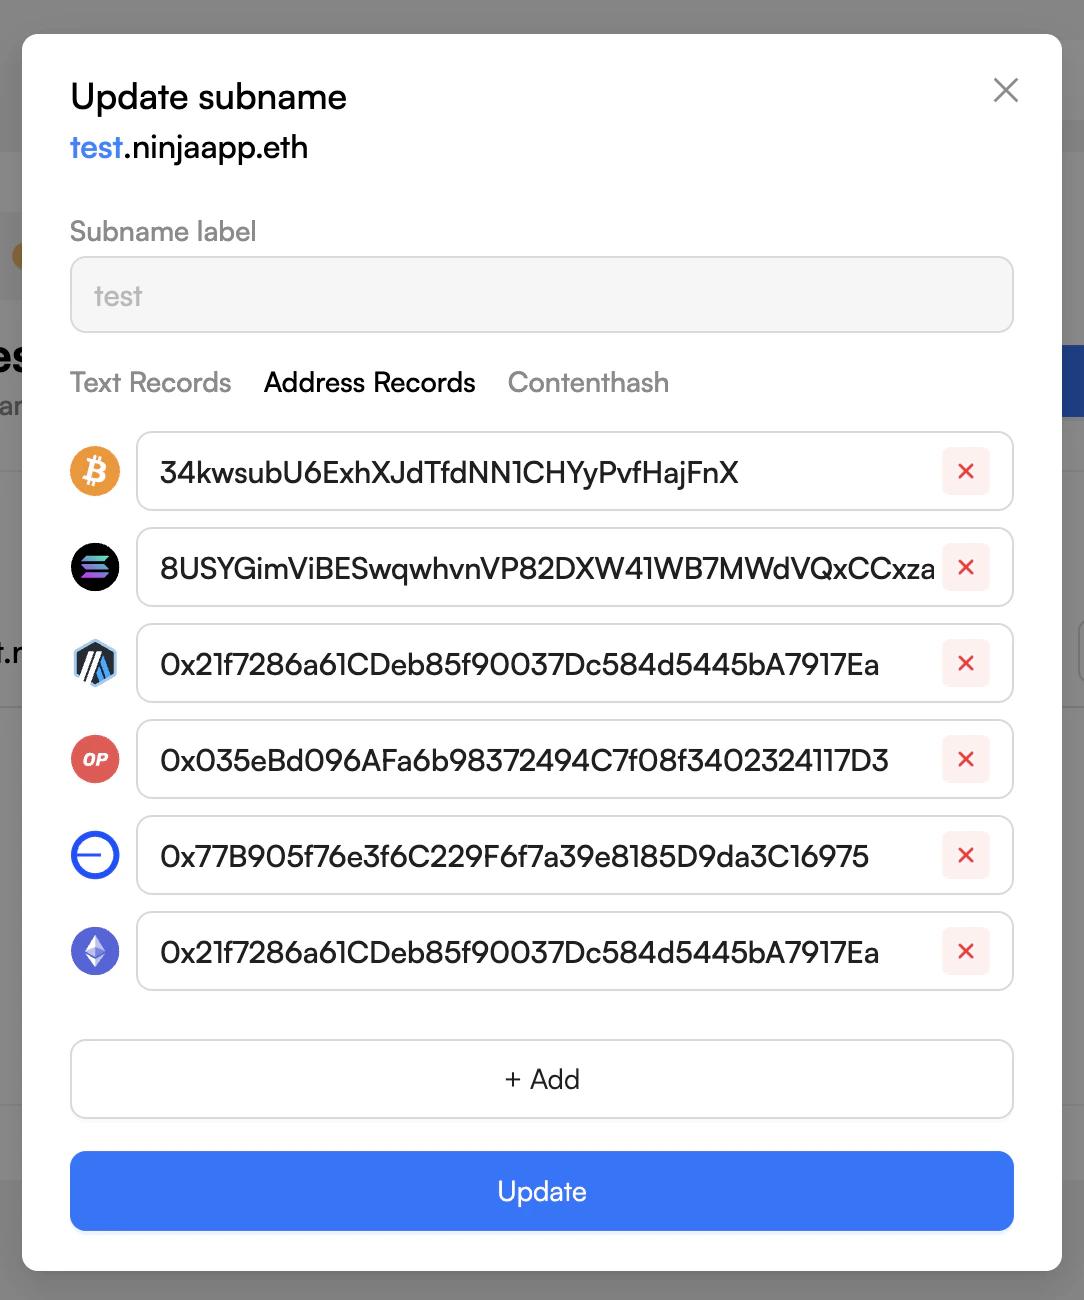
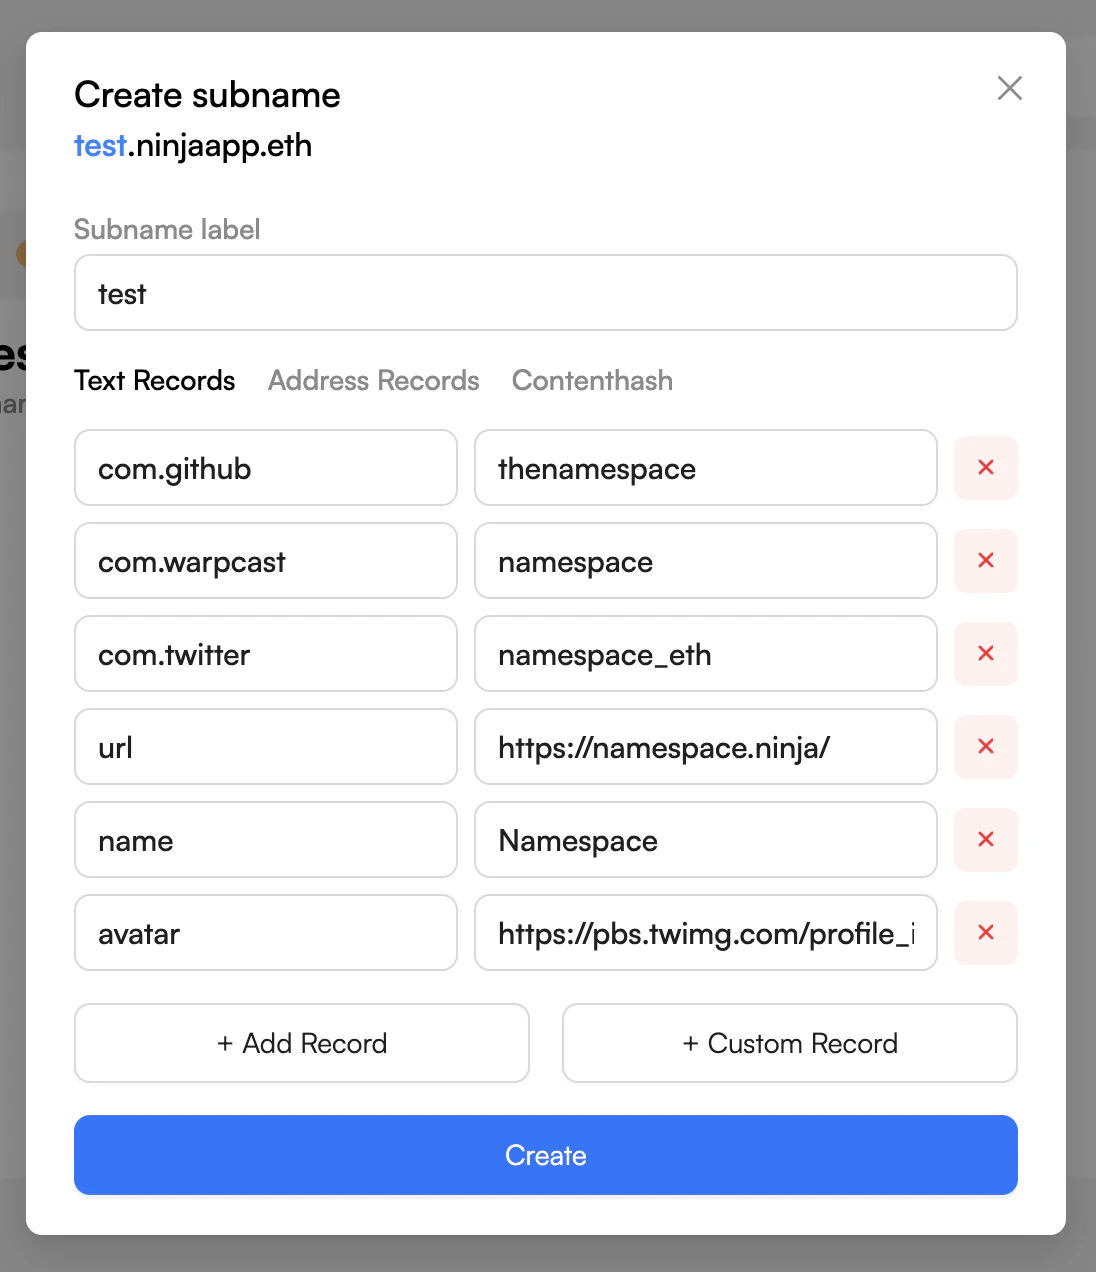
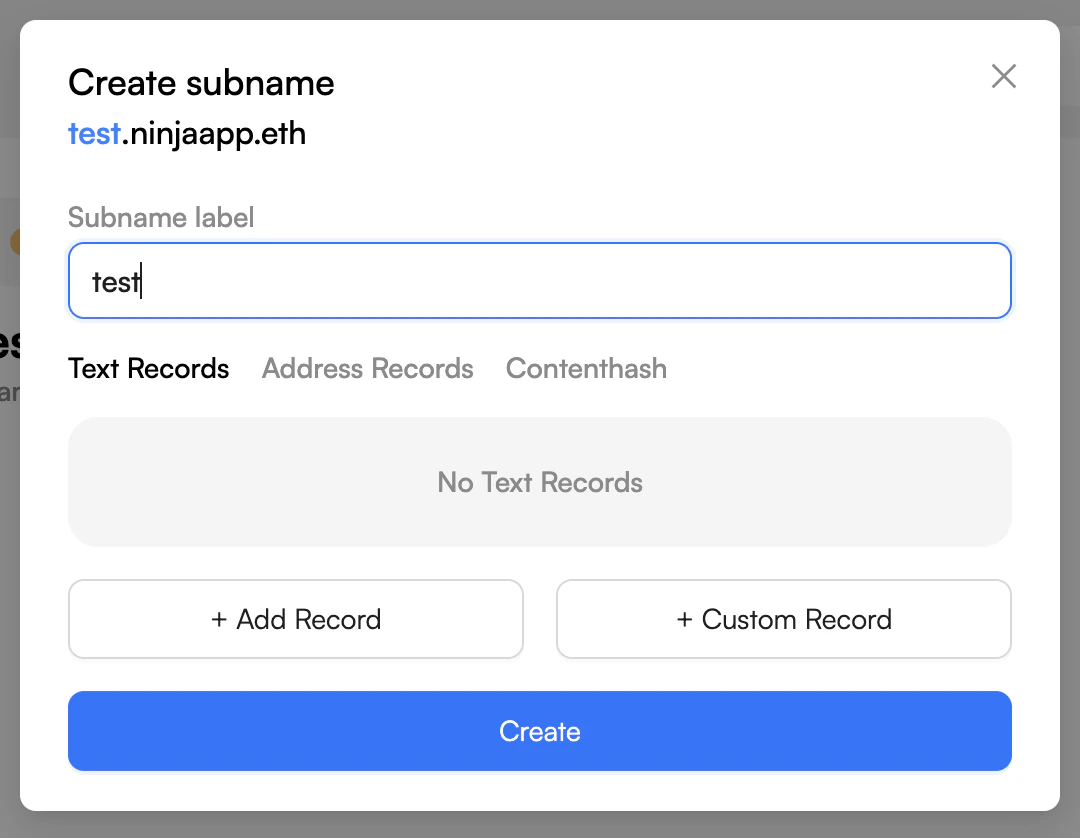
### Edit records
You can edit any record for subnames — **Text Records**, **Address Records**, and **Contenthash Records**.
{" "}
# ENS Widget
Source: https://docs.namespace.ninja/user-guide/ens-widget
The easiest way to sell ENS Names and Subnames from your website.
The ENS Widget is designed to support ENS Name and Subname registration and allow anyone to seamlessly issue and sell both ENS Names and Subnames.
### **Getting started**
To get started, go to [app.namespace.ninja](http://app.namespace.ninja) then head to the **Account** icon.
This step assumes that you already have an ENS Name. If you don't, you will need to register one on the [Namespace app](https://app.namespace.ninja/) or [ENS app](https://app.ens.domains/).
To enable Subname registrations through the ENS Widget, you first need to **activate your ENS name(s)**. Once activated, others will be able to mint Subnames from them.
See the step-by-step guide on how to activate an ENS Name.
Once you've listed the name(s), you navigate to: Account->Widgets and create the Widget from there.
Choosing a widget type comes down to the fact of what specifically you want to sell. Currently, there are 4 different types you can choose from:
1. **All Names** — all available Subnames, from all listed ENS Names on the Namespace platform from every ENS Name owner, will appear in the search and people will be able to mint them from the Widget.
2. **Owned Names** — all available Subnames, from your listed ENS Names only, will appear in the search and people will be able to mint them from the Widget.
3. **Selected Names** — all available Subnames, from the ENS Names you listed and selected, will appear in the search and people will be able to mint them from the Widget.
4. **Single Selected Name** — all available Subnames, from only one ENS Name that you listed and selected, will appear in the search and people will be able to mint them from the Widget.
If you opt for either option 3 or 4 outlined above, you'll be prompted to select the ENS Names you wish to add to the Widget. Only these selected Name(s) will be used for issuing Subnames.
You can optionally allow people to register 2nd-level ENS Names from your Widget as well, by turning ON the "*Allow ENS Name Registrations*" toggle button.
Once you're happy with your setup, you can click update. You'll be prompted to sign the update, and the widget will then be updated with the latest changes and with your wallet completely gaslessly.
Once you're done customizing and setting up your Widget, you can add it to your website by copying and pasting the Integration Code, and start issuing Subnames directly from there.
# SDK and API
Source: https://docs.namespace.ninja/user-guide/sdk-and-api
Quickest way to build ENS subname projects
We provide the easiest way to bring **ENS subnames**—onchain or offchain—directly into your app, wallet, rollup, AI-agent, community, or service. Whether you’re a developer building from scratch or a product team shipping at scale, our tools simplify subname integration while keeping everything fully **ENS-compatible** and **production-ready**.
Namespace SDK and API already power wallets, rollups, payment apps, communities, and AI projects across the ecosystem and run hundreds of thousands of subnames. They’re designed to scale from **one** to **millions of subnames**, without tradeoffs between simplicity and control.
## **One toolkit, two ways to build**
1. **Namespace SDK**: A developer toolkit for teams who want to run their own setup and bake ENS logic straight into their stack.
Dive deeper into Namespace SDK
2. **Namespace API**: A hosted service for teams who just want it to work—fast, scalable, no infrastructure required.
Dive deeper into Namespace API
Both paths give you the same outcomes: subname creation, resolution, management, and scaling—without reinventing the wheel.
## **Why Use Namespace SDK & API?**
* **Simple Integration** – Get up and running in minutes with clear documentation, prebuilt functions, and support for both onchain and offchain subnames.
* **Scalable & Flexible** – Handle high-volume naming with ease. From gasless offchain subnames to fully onchain integrations, you choose the model that fits your product.
* **Universal Resolution** – Use ENS names or subnames as a universal identity layer across wallets, apps, chains, contracts, and communities.
* **Developer Friendly** – Our SDK (JavaScript/TypeScript) and API are designed to plug directly into your stack and make it easy to build on ENS and Subnames.
## **What you can do with it**
With Namespace, you can:
* **Issue identities at scale** → Give every user, wallet, or agent their own ENS name.
* **Simplify resolution** → Resolve any ENS name/subname instantly.
* **Customize experiences** → Branded subnames for your product, community, or ecosystem.
* **Stay flexible** → Start with offchain subnames (gasless, free to mint) and move onchain or to L2s when it makes sense.
# Subpages
Source: https://docs.namespace.ninja/user-guide/subpages
White-label template with ENS subname onchain minting embedded.
Subpages is a customizable white-label subname minting template that enables ENS name owners (companies, communities, DAOs, and others) to issue subnames from a custom-built website in record time. For example, if an organization owns *awesome.eth*, using Subpages, they can quickly spin up a custom website to allow members to mint personalized subnames like **alice**.awesome.eth.
## **Features**
* **Quick Deployment** — fully functional minting site in minutes
* **Customizable Design** — tailor appearance to your brand
* **Wallet Integration** — RainbowKit out of the box
* **ENS Subname registration** — mint under your ENS name
* **L1 and L2** Compatibility
* **Responsive UI** — works on all devices
* **Referral System** — incentivize sharing
## **Examples**
* OP Punks: [**oppunk.namespace.ninja**](http://oppunk.namespace.ninja)
* PizzaDAO: [**pizzadao.namespace.ninja**](http://pizzadao.namespace.ninja)
* SheFi: [**shefi.namespace.ninja**](http://shefi.namespace.ninja)
## Get started
Launch your subname minting website in 5 minutes